Sign Made Easy now supports Bulk E-Signature Transactions, enabling users to initiate multiple e-signature transactions simultaneously for selected Salesforce records. The system automatically creates individual transactions for each selected record, streamlining high-volume signing workflows, reducing manual effort, and improving operational efficiency.
Step-by-Step Guide to Bulk E-Signature Transactions
Note: To use the Bulk Sign feature, you must have a Sign Template configured with the Sending Experience set to SendNow. For instructions on creating a Sign Template, refer to the Sign Template User Manual.
Step 1:- Open the Salesforce App Launcher, search for Bulk Sign, and open it to access the Bulk Sign page.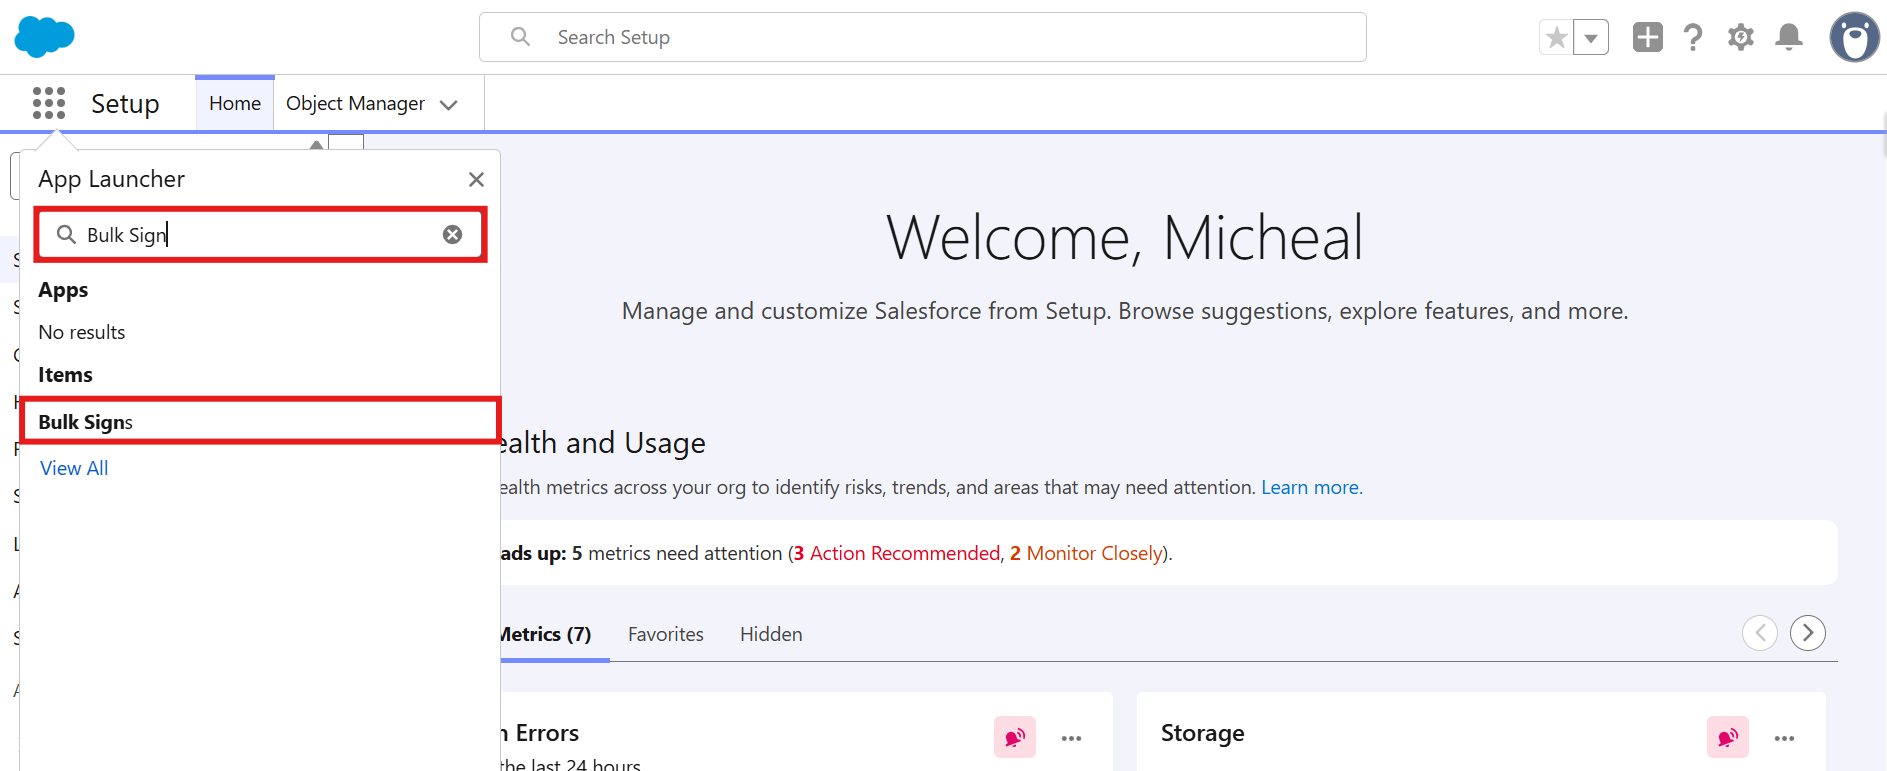
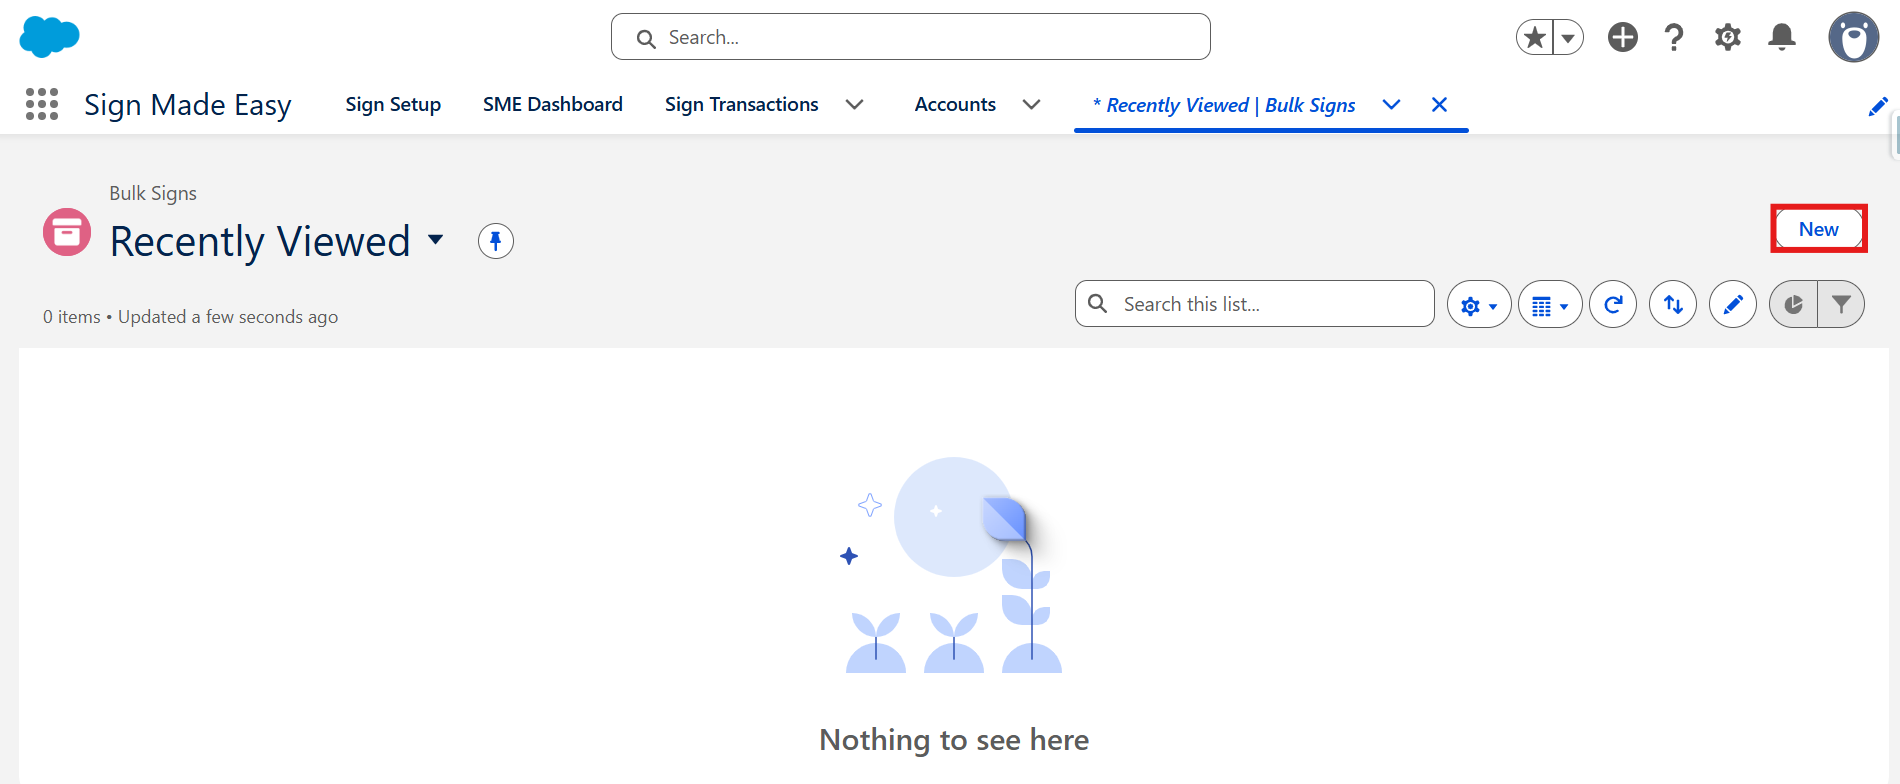
Step 2:- Create a New Bulk Sign Record
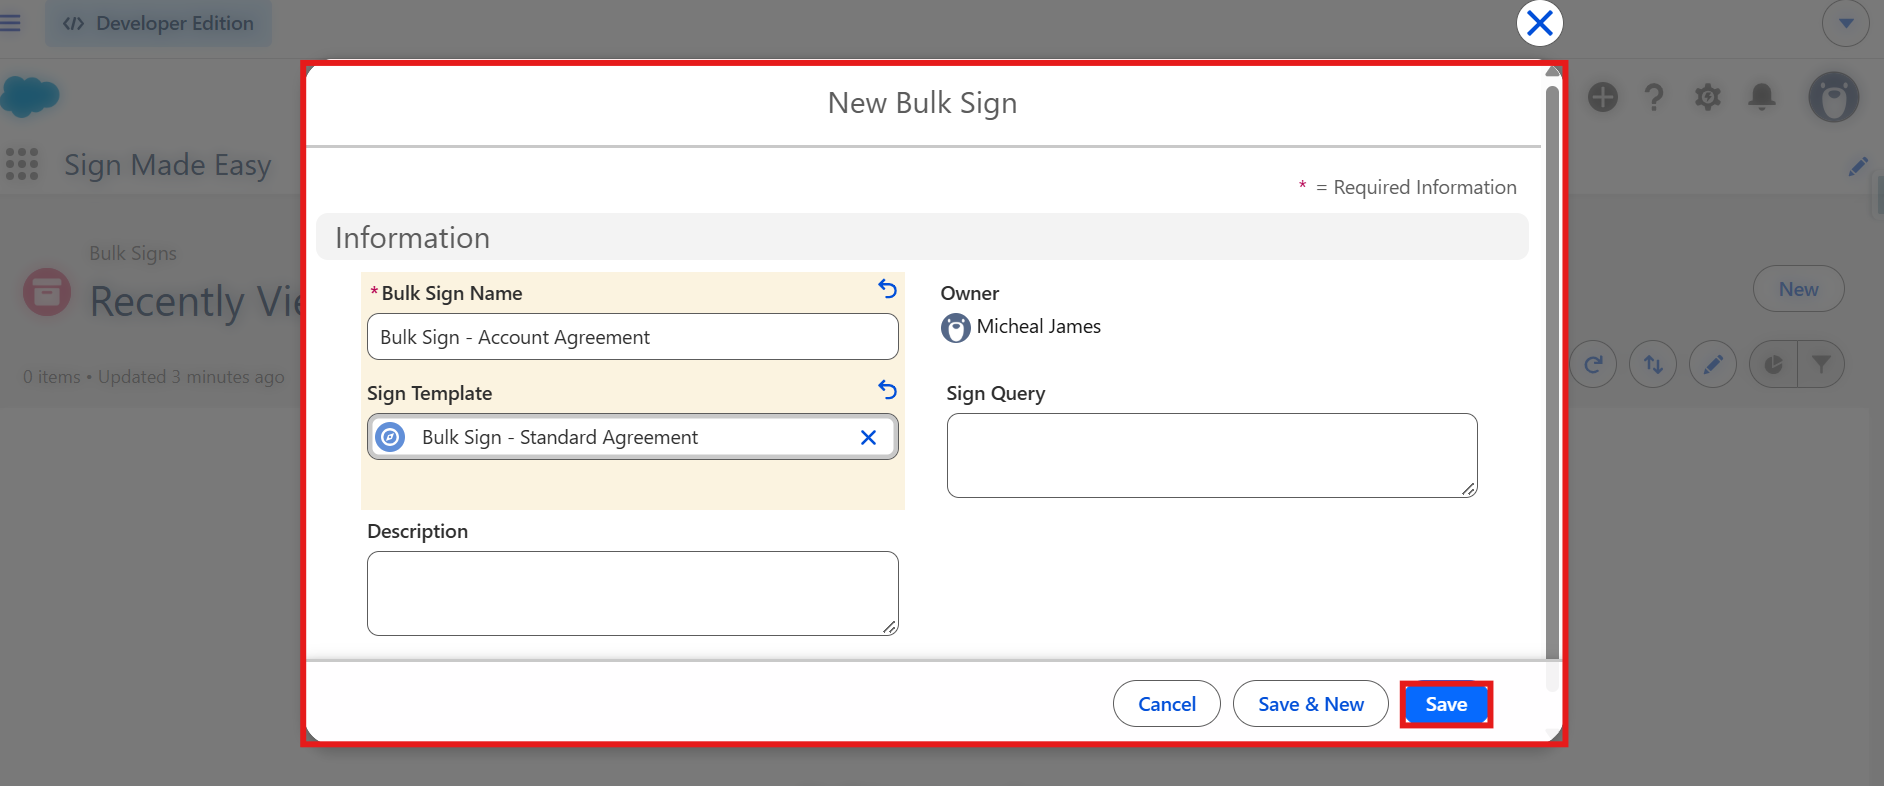
After clicking the New button, the New Bulk Sign modal appears. Enter the required information to configure the bulk signing process.
- Bulk Sign Name: Enter a name to identify the bulk signing configuration. This is a required field.
- Sign Template: Search for and select the Sign Template you want to use for the bulk signing process. Ensure that the selected template is configured with the SendNow sending experience.
- Sign Query: Enter the query used to identify the Salesforce records for which individual signing transactions will be created.
- Description: Enter an optional description to explain the purpose of the bulk signing configuration
Note: You can also create or configure the query after creating the Bulk Sign record using the Query Editor, as explained in the following steps.
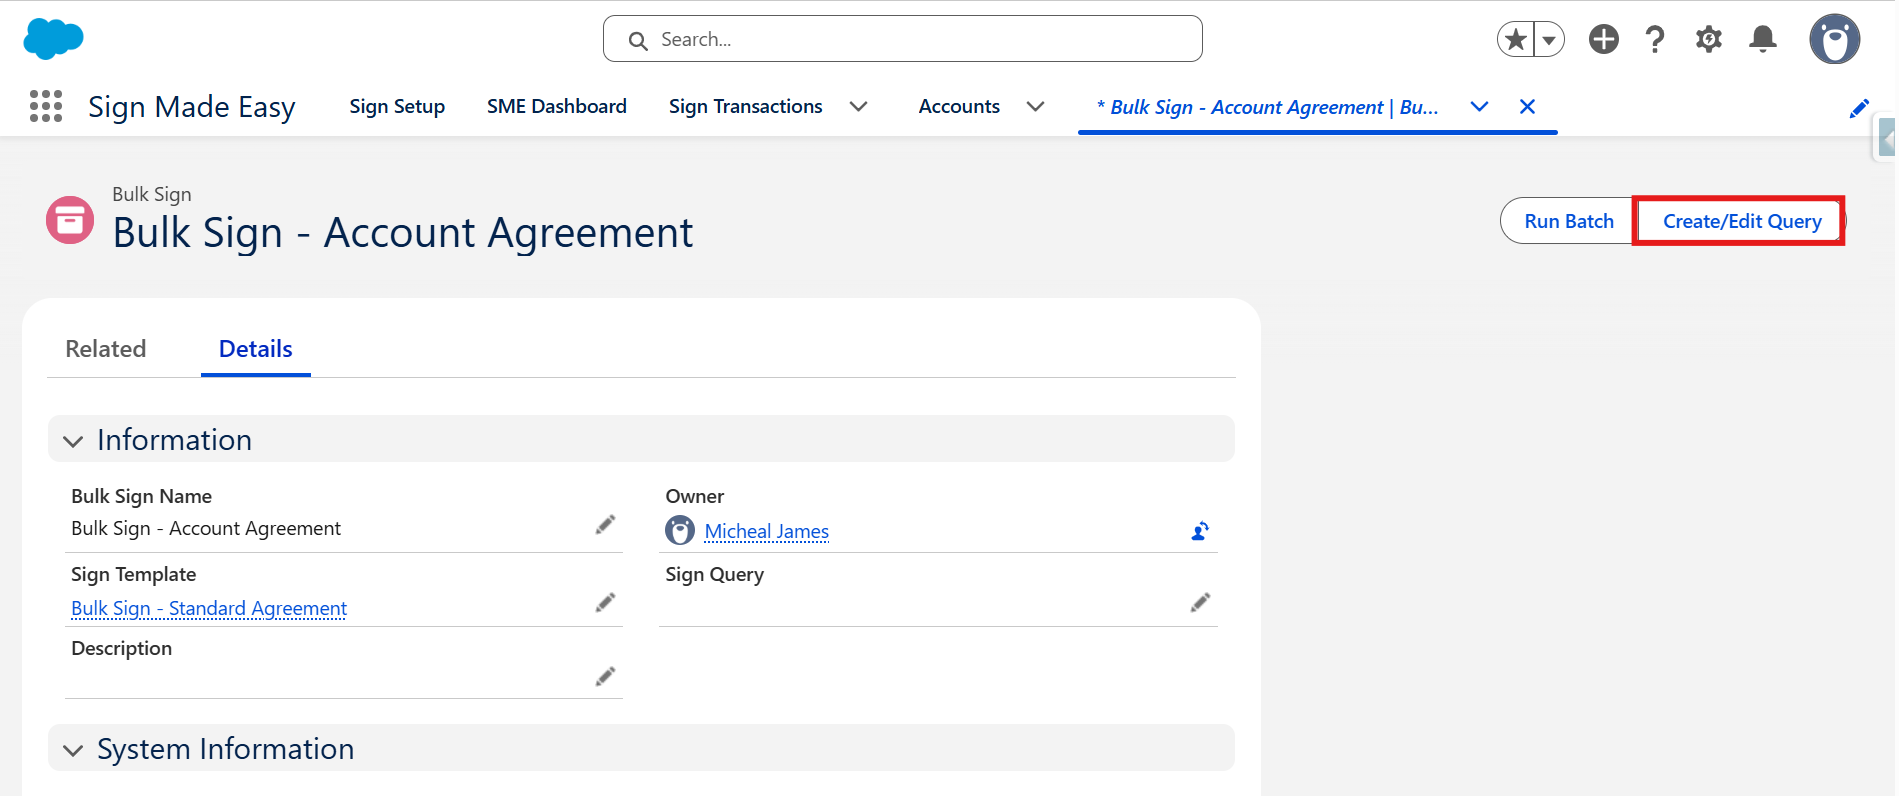
Step 3:- Open the created Bulk Sign record and click the Create/Edit Query button .
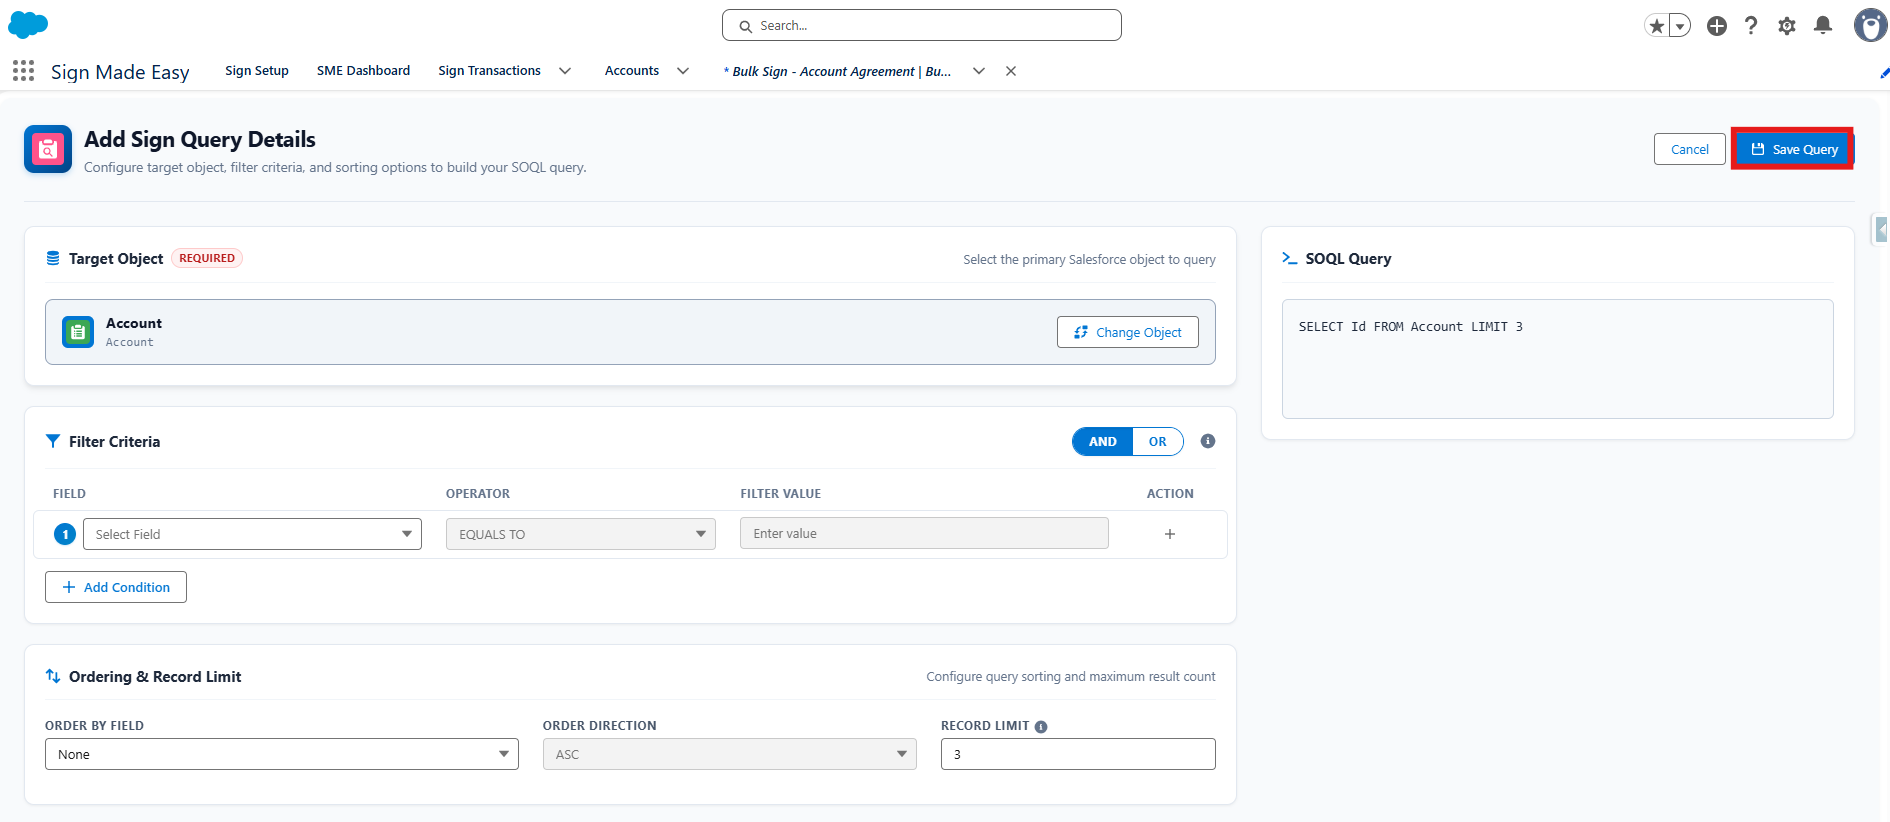
The Add Sign Query Details page allows you to select Salesforce records for bulk signing by choosing an object, setting filter conditions, and configuring sorting and record limits.
1. Target Object
Select the Salesforce object whose records you want to include in the bulk signing process.
Search an Object: Search for and select an object, such as Account, Contact, or Lead.
Required: You must select a target object before configuring the query.
2. Filter Criteria
Use this section to select which records should be included in the query.
Field: Select the Salesforce field you want to filter by.
Operator: Select a condition, such as Equals To, to compare the field value.
Filter Value: Enter the value you want to match.
AND / OR: Choose how multiple conditions are combined. AND requires all conditions to match, while OR requires at least one condition to match.
+ / Add Condition: Add another filter condition to refine your query.
3. Ordering & Record Limit
Use these options to control the order and number of records returned.
Order By Field: Select the field used to sort the records, or choose None if sorting is not required.
Order Direction: Select ASC for ascending order or DESC for descending order.
Record Limit: Enter the maximum number of records to retrieve, such as 100.
4. SOQL Query
The SOQL Query panel displays the query generated based on your selections. Review the query to check which Salesforce records will be retrieved.
The Query Editor provides two action buttons, each serving the functions described below:
Save Query: Saves the configured query for the Bulk Sign record.
Cancel: Exits the query editor without saving the current changes.
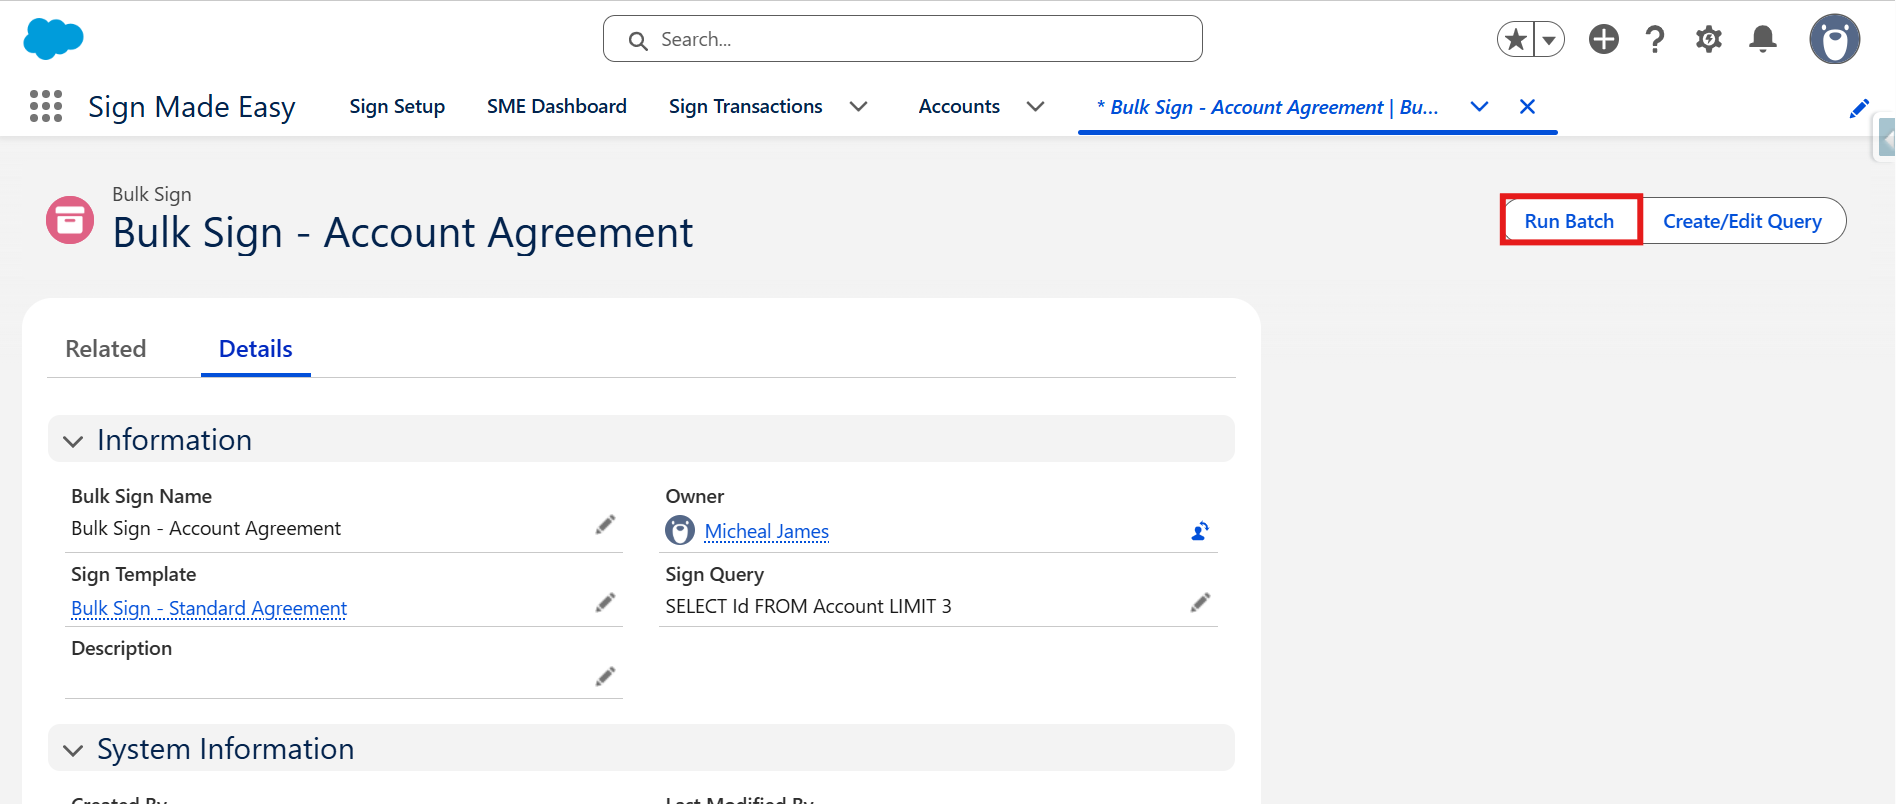
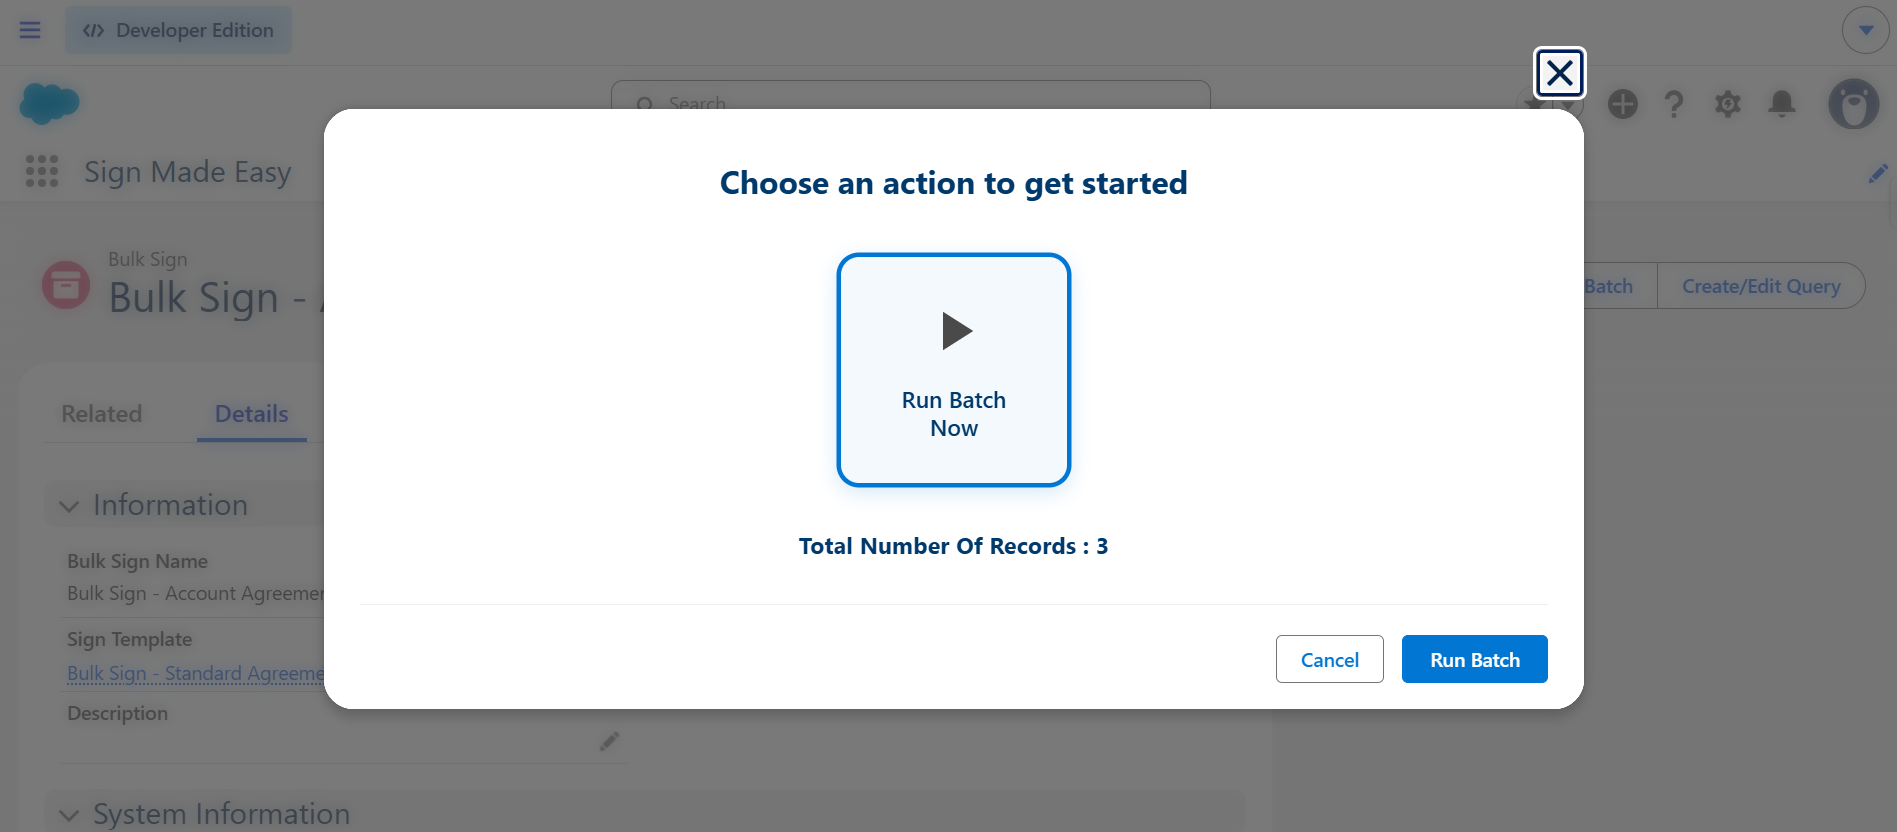
Step 4:- On the Bulk Sign record page, click the Run Batch button to initiate the bulk signing process. A modal will appear displaying the total number of Salesforce records retrieved based on your configured query.
These records will be included in the bulk signing process, and individual e-signature transactions will be created for the selected records.
There are two action buttons, each serving the functions described below:
Cancel: Click this button to close the modal without starting the bulk signing process.
Run Batch: Click this button to start processing the records retrieved by the configured query and initiate individual e-signature transactions for the eligible records.
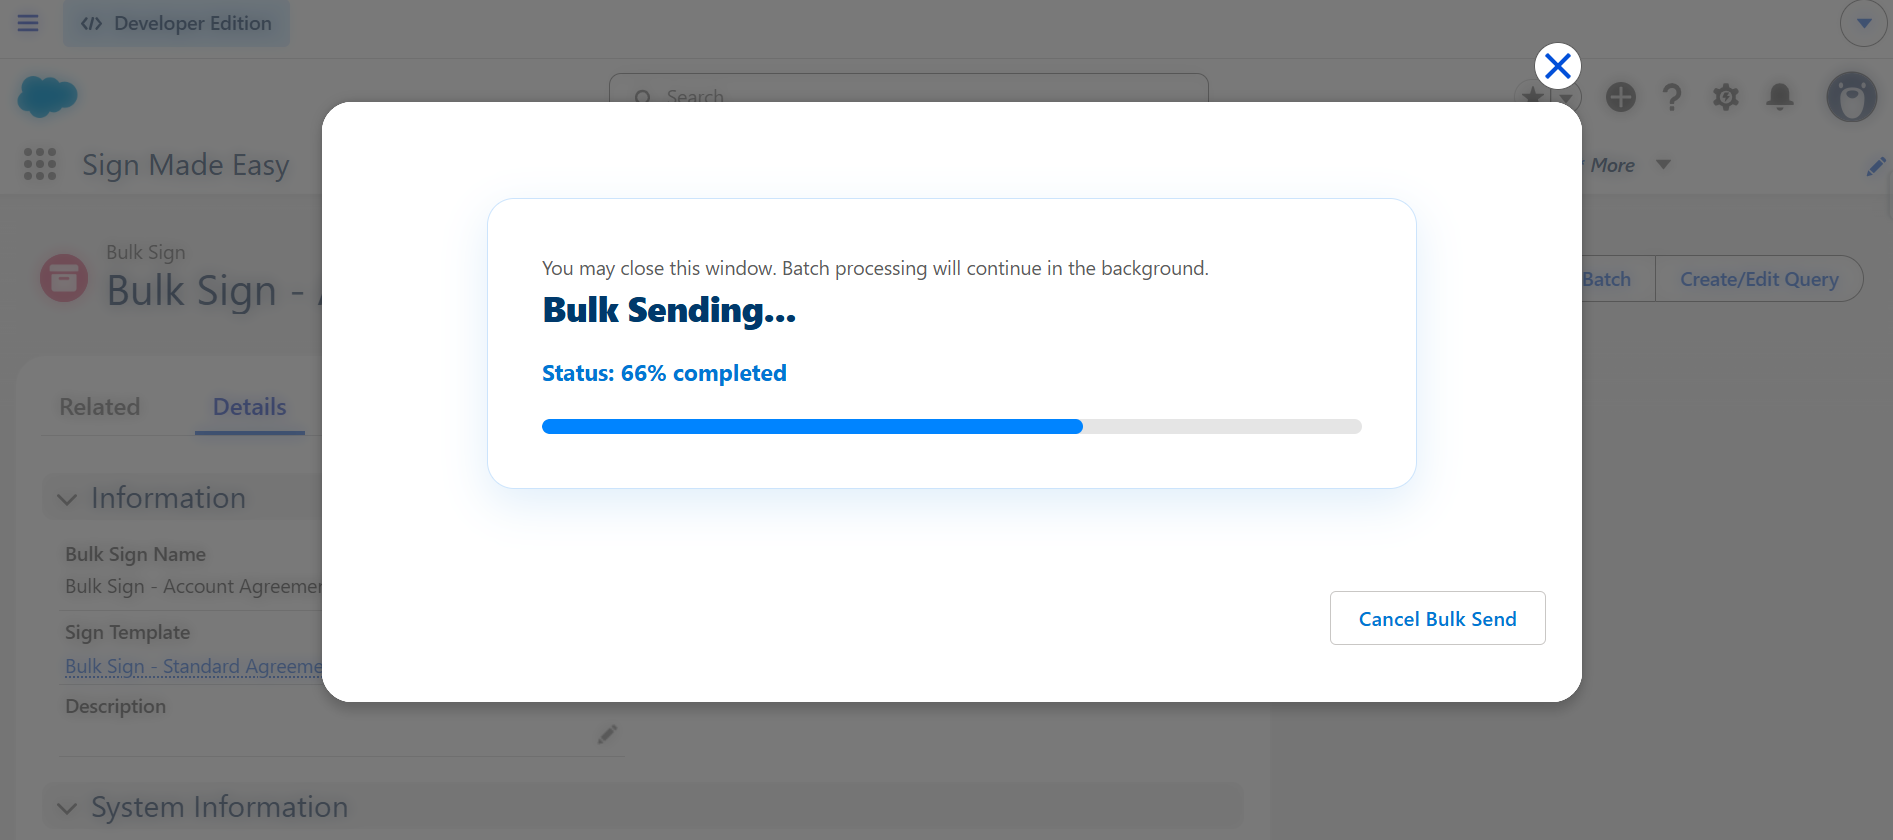
Step 5:- After clicking the Run Batch button, the system begins processing the bulk signing transactions in the background. A progress indicator displays the current completion percentage.
Cancel Bulk Send: Click this button to cancel the ongoing bulk sending process if you no longer want to proceed with the remaining transactions.
Was this article helpful?
That’s Great!
Thank you for your feedback
Sorry! We couldn't be helpful
Thank you for your feedback
Feedback sent
We appreciate your effort and will try to fix the article