Parameters:
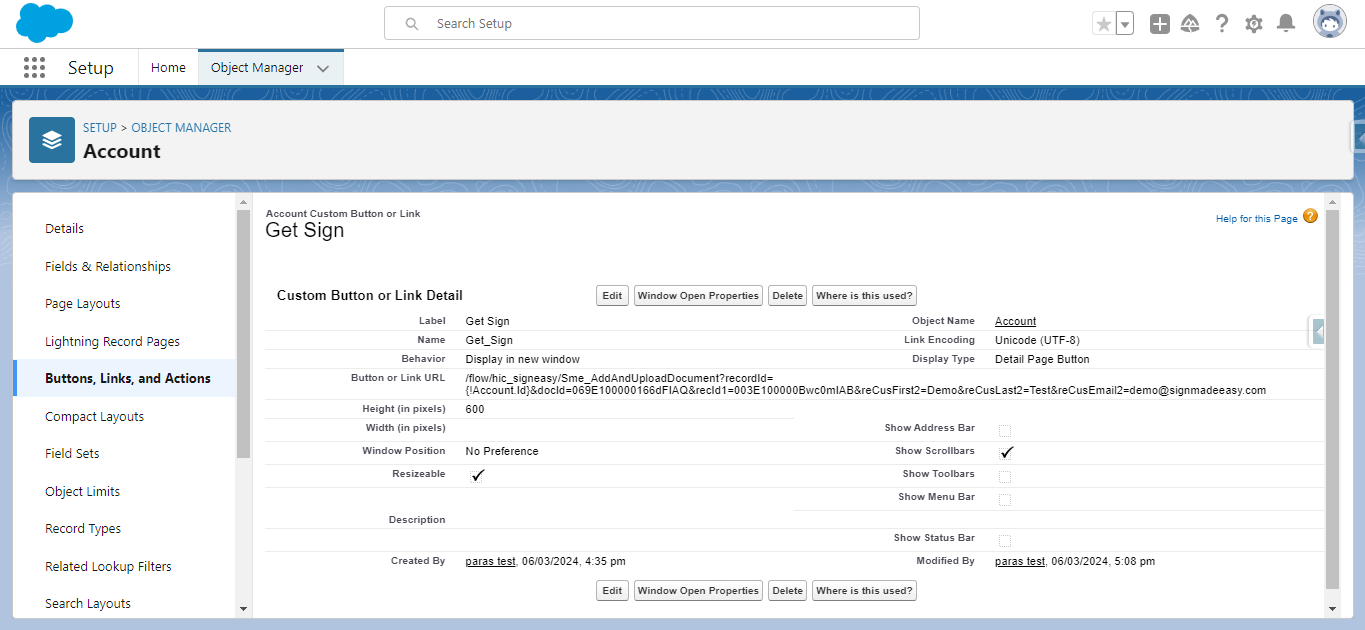
1: reCusEmail
Parameter Name : &reCusEmail
Parameter Description : Email Parameter for the first custom recipient
Example : &reCusEmail1
Note : Supports maximum 10 recipients, need to only change the last value in order to use.
Ref : For 4th recipient use &reCusEmail4=sign@gmail.com
2: reCusFirst
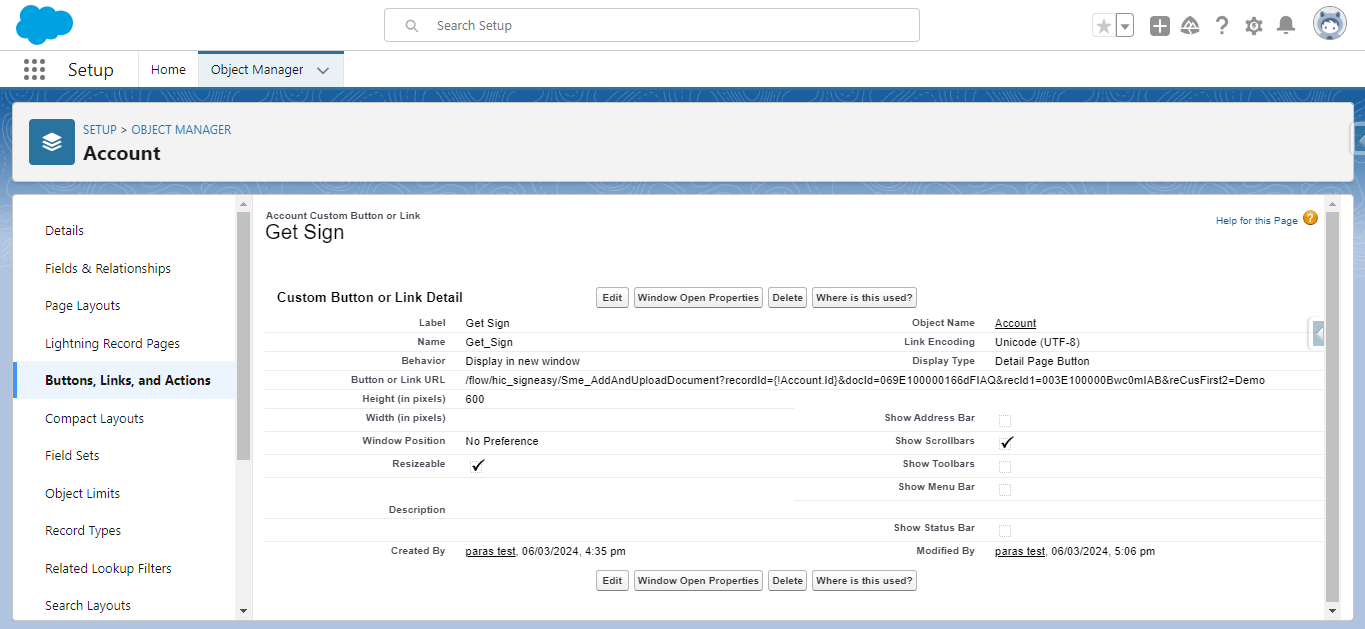
Parameter Name : &reCusFirst
Parameter Description : First name parameter for the first recipient.
Example : &reCusFirst1
Note : Supports maximum 10 recipients, need to only change the last value in order to use.
Ref : For 4th recipient use &reCusFirst4=sign
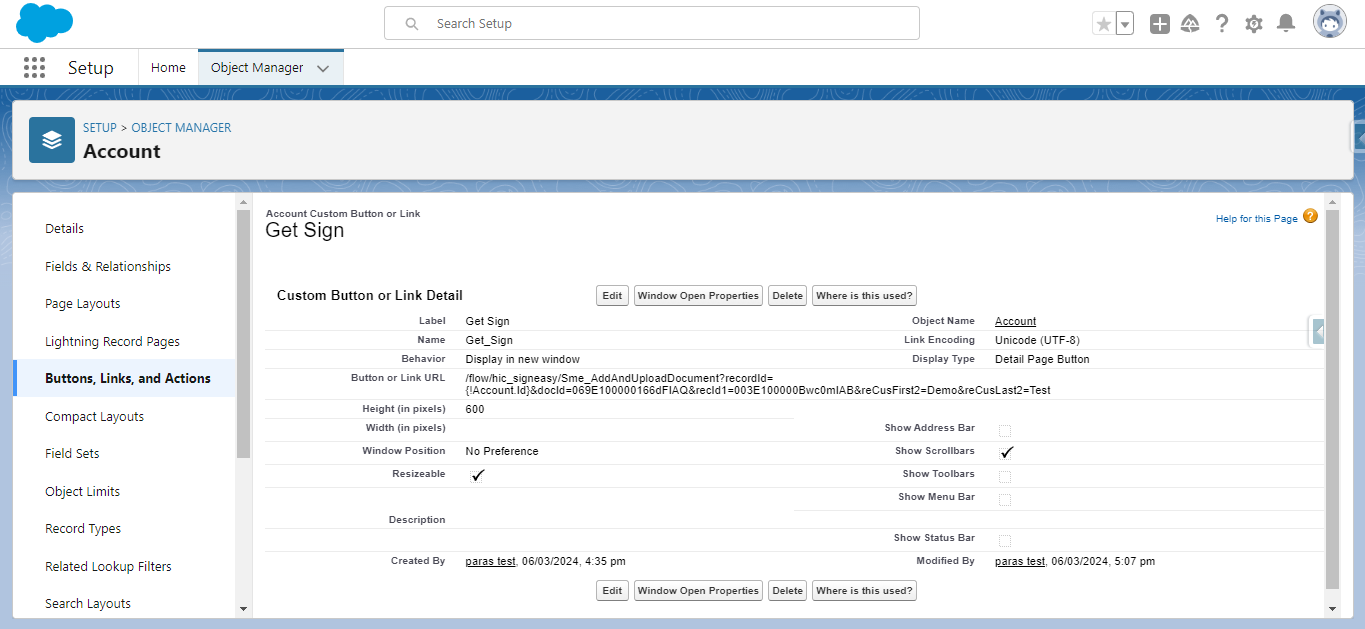
3: reCusLast
Parameter Name : &reCusLast
Parameter Description : Last name Parameter for the first custom recipient
Example : &reCusLast1
Note : Supports maximum 5 recipients, need to only change the last value in order to use.
Ref : For 4th recipient use &reCusLast4=Easy
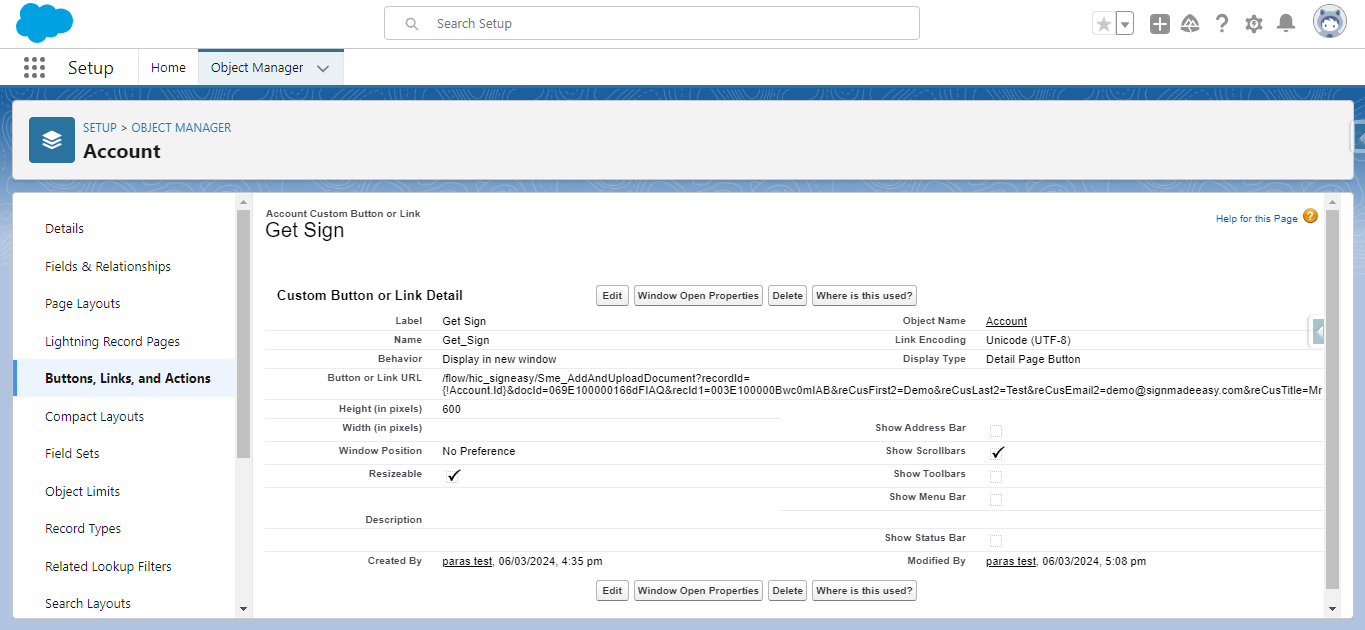
4: reCusTitle
Parameter Name : &reCusTitle
Parameter Description : Title Parameter for the first custom recipient
Example : &reCusTitle1
Note : Supports maximum 10 recipients, need to only change the last value in order to use.
Ref : For 4th recipient use &reCusTitle5=Mr
5: reCusRole
Parameter Name : &reCusRole
Parameter Description : Role parameter for the first recipient.(Signer,InPersonSigner,CC)
Example : &reCusRole1
Note : Supports maximum 10 recipients, need to only change the last value in order to use.
Ref : For 4th recipient use &reCusRole4= Signer
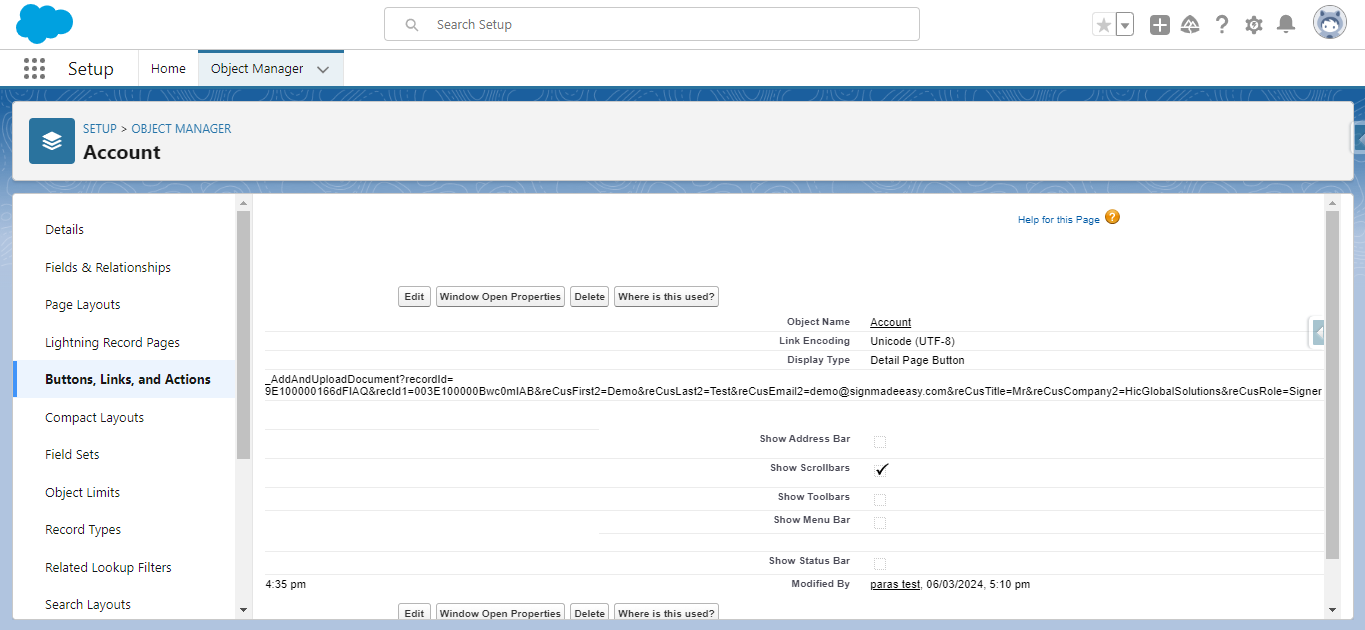
6: reCusCompany
Parameter Name : &reCusCompany
Parameter Description : Company Parameter for the first custom recipient
Example : &reCusCompany1
Note : Supports maximum 10 recipients, need to only change the last value in order to use.
Ref : For 4th recipient use &reCusCompany4=HIC
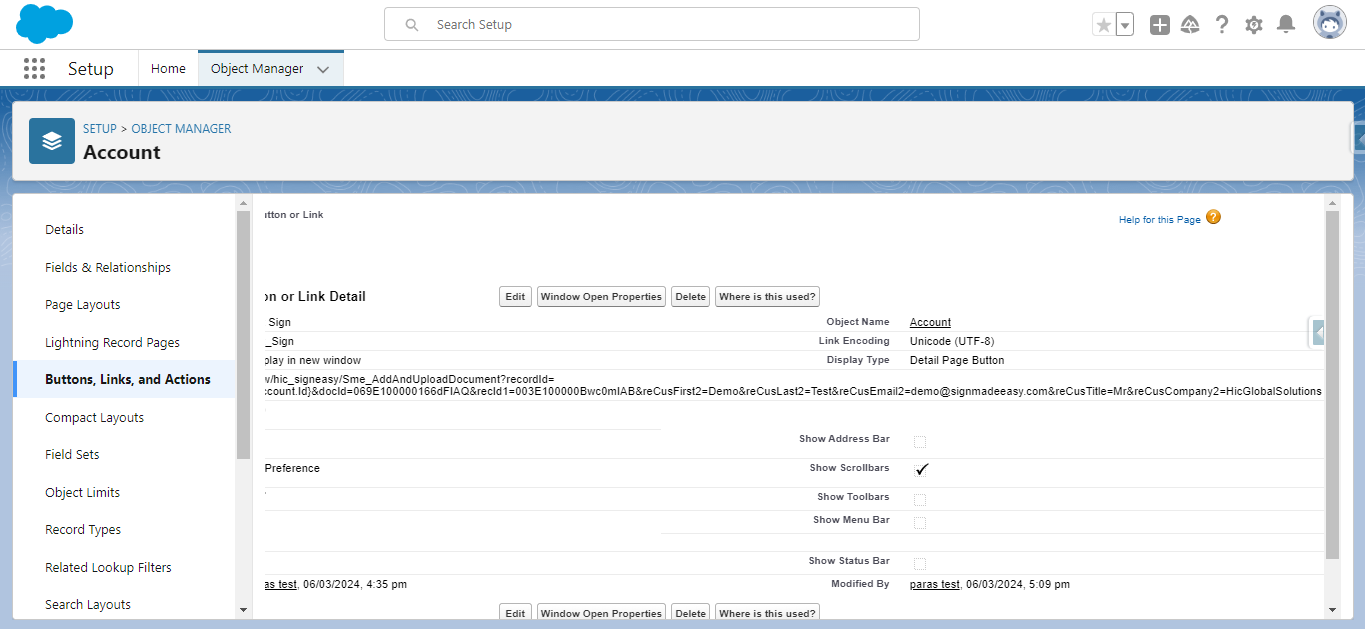
7: reCusLang
Available In: Sign Made Easy Pro
Parameter Name : &recusLang1
Parameter Description : Language Parameter for the custom recipient
Example : &reCusLang1
Ref : &reCusLang1=it
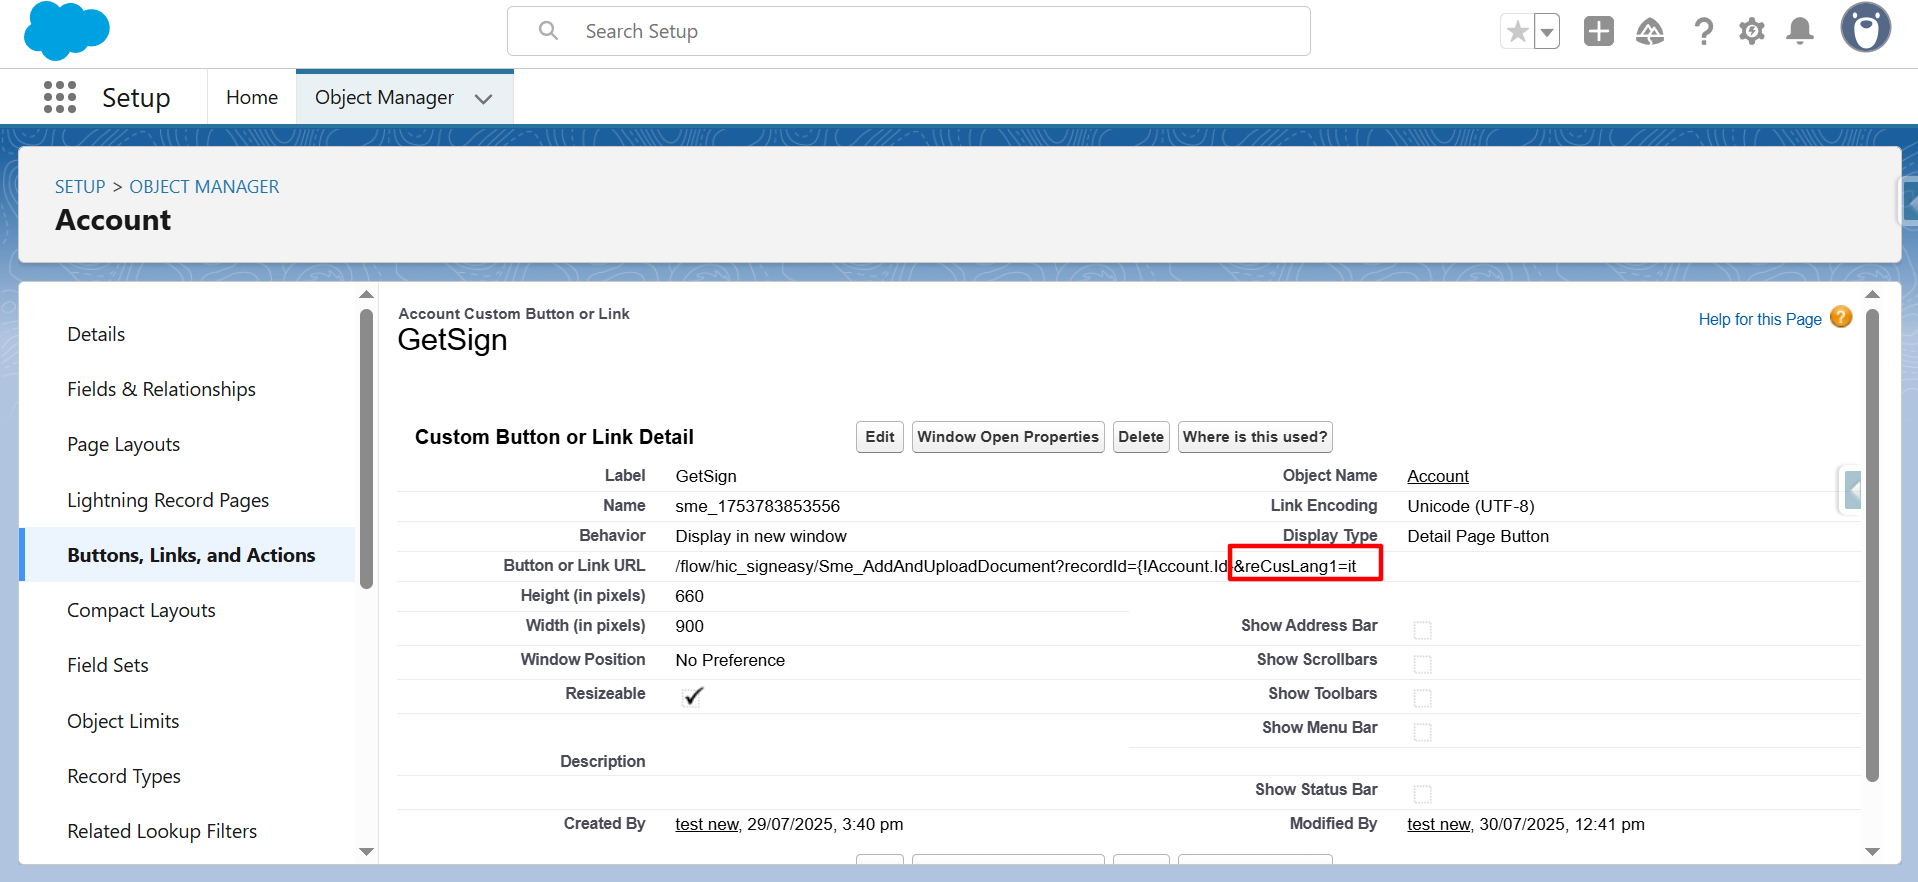
8: docIds
Parameter Name : &docIds
Parameter Description : A Document ID that automatically selects a document on the screen.
A comma separated document id that automatically selects multiple documents on the screen.
Example : &docIds
Note : Supports maximum 10 documents.
Ref : &docIds=069E100000166dFIAQ
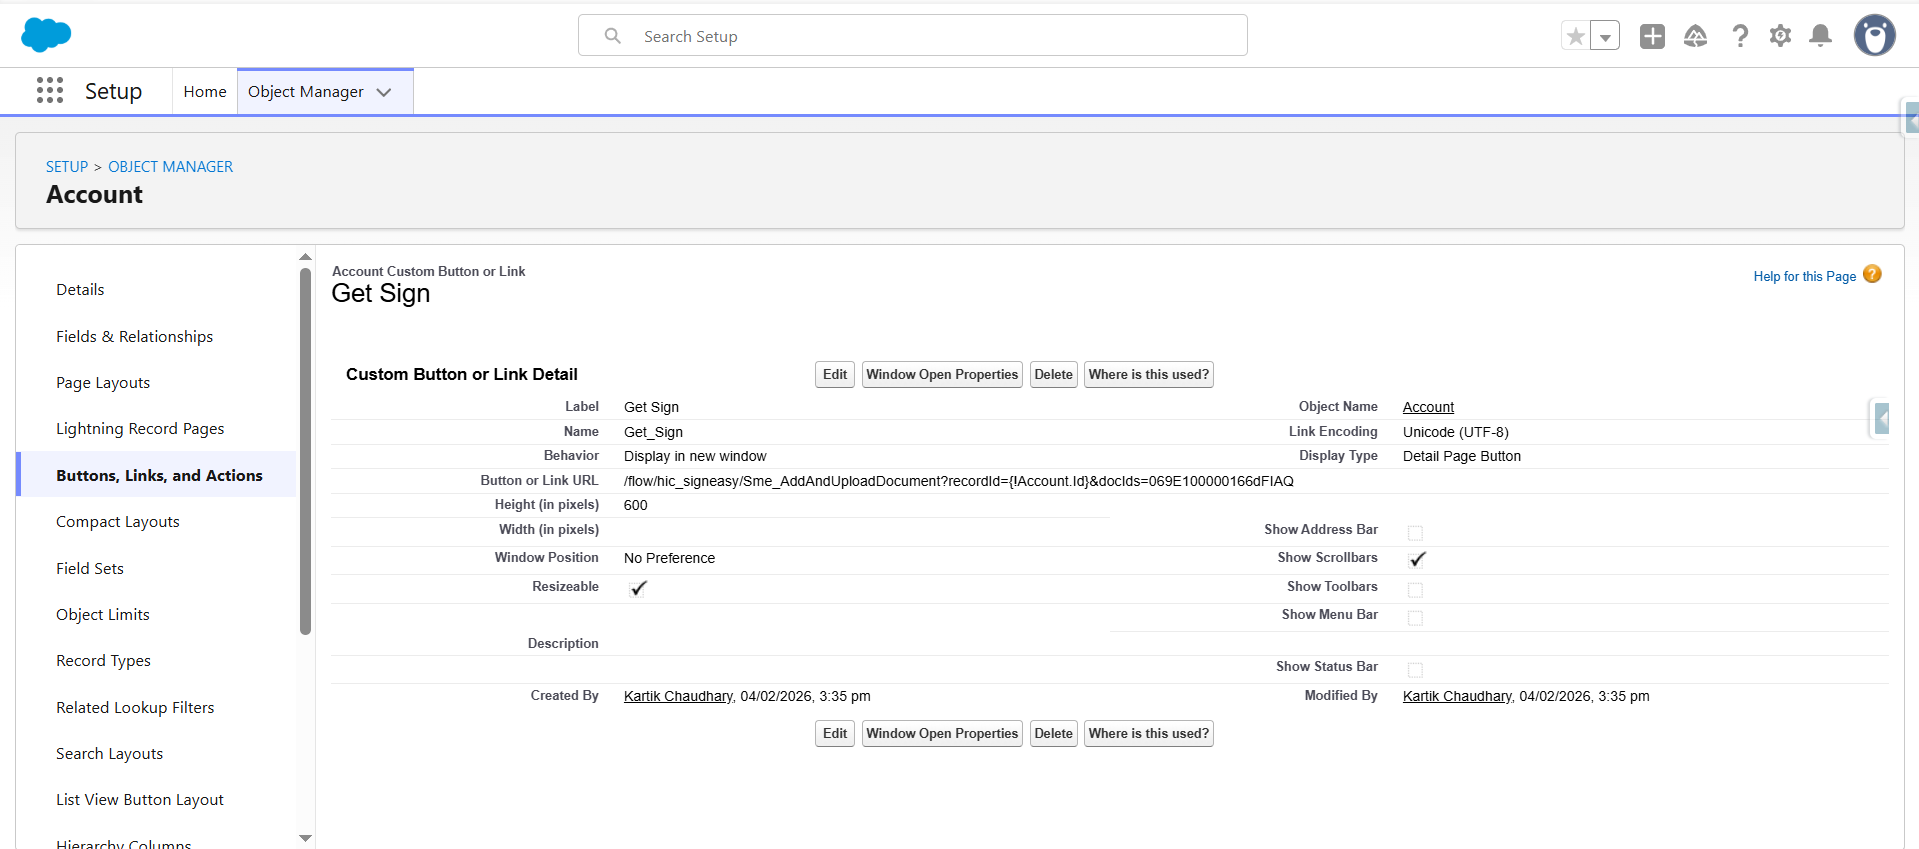
9: signingOrder
Parameter Name : &signingOrder
Parameter Description : Selection of Signing order (True) that automatically selects on the screen.
Example : &signingOrder
Ref : &signingOrder=true
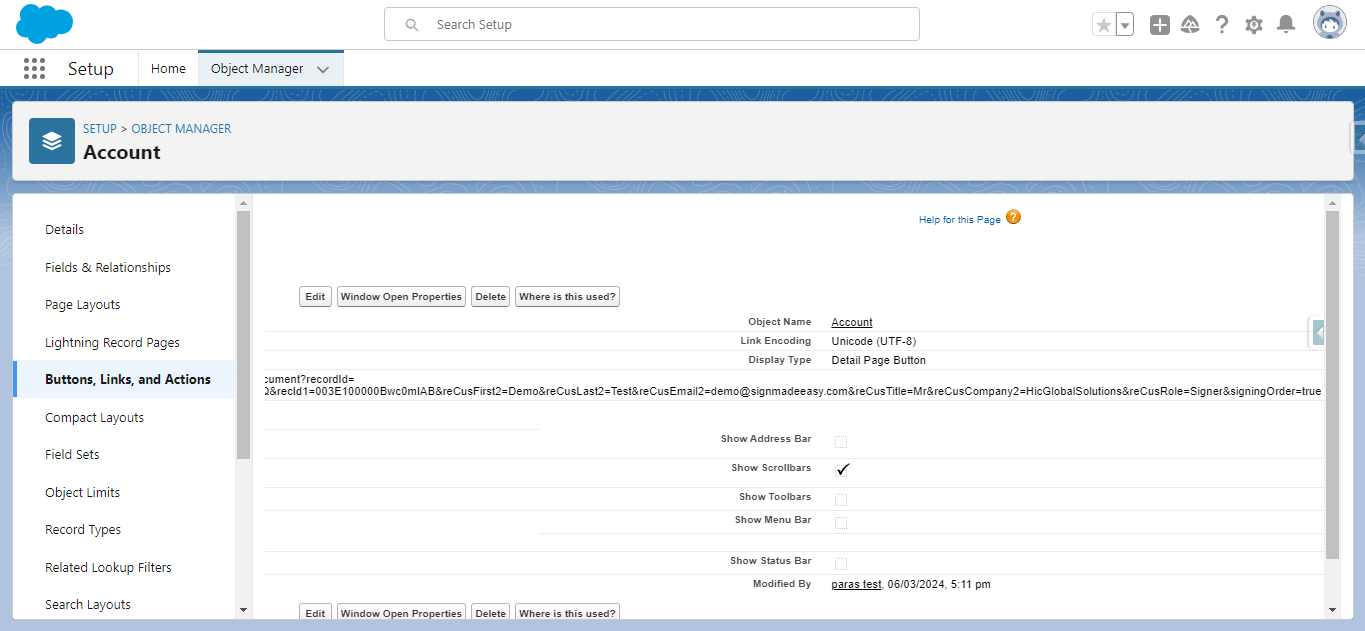
10: recId
Parameter Name : &recId
Parameter Description : A Recipient ID that automatically selects a Recipient on the screen. A selection of recipient Ids that automatically selects multiple recipients on the screen.
Example : &recId1
Note :- When adding dynamic recipients, you have to use the CASESAFEID() function to convert 15 digit record ID into 18 digit record IDs.
For Example :- &recId1={!CASESAFEID( Account.ContactId__c )}
Note:
- Supports maximum 10 recipients, need to only change the last value in order to use.
- You can Add Recipient dynamically Only from Contact , Lead or User.
Ref : For 3rd reipients use &recId3=003gL00000Hz0kTQAR
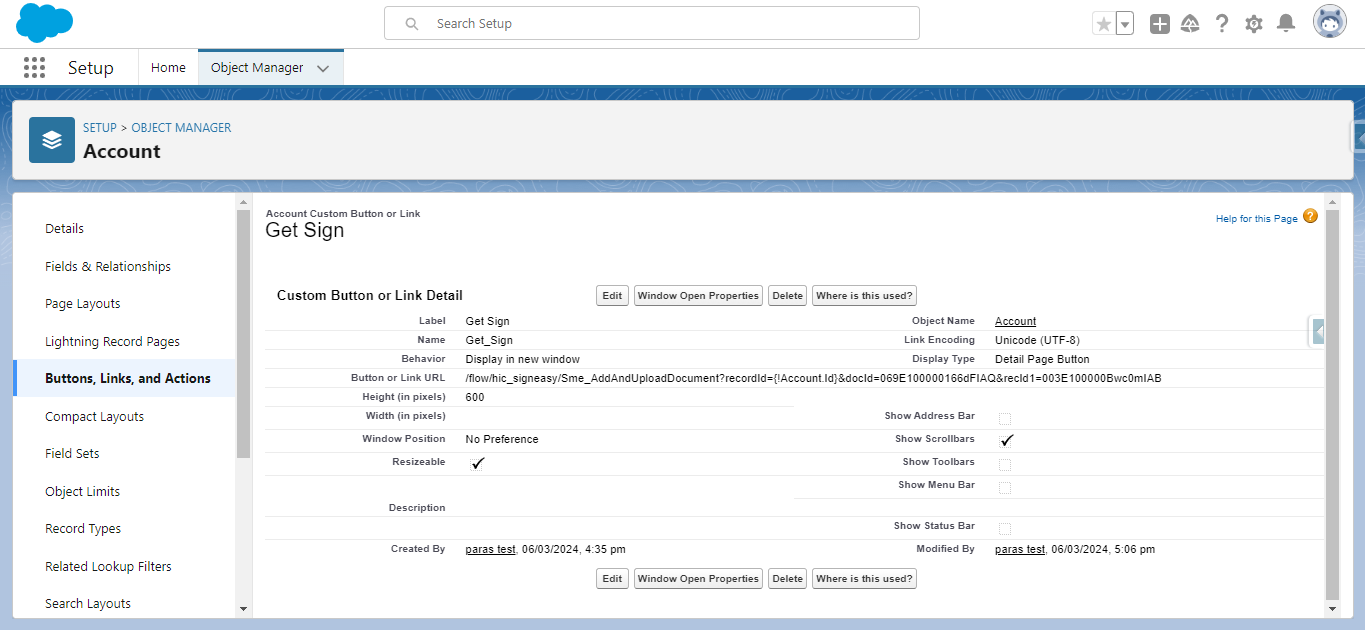
11: role
Parameter Name : &reCusRole OR &role
Parameter Description : Role parameter for the first recipient.(Signer,InPersonSigner,CC)
Example : &reCusRole1 ( for Custom recipient )
Example : &role1 ( for Standard recipient )
Ref : For 4th recipient use &reCusRole4= Signer
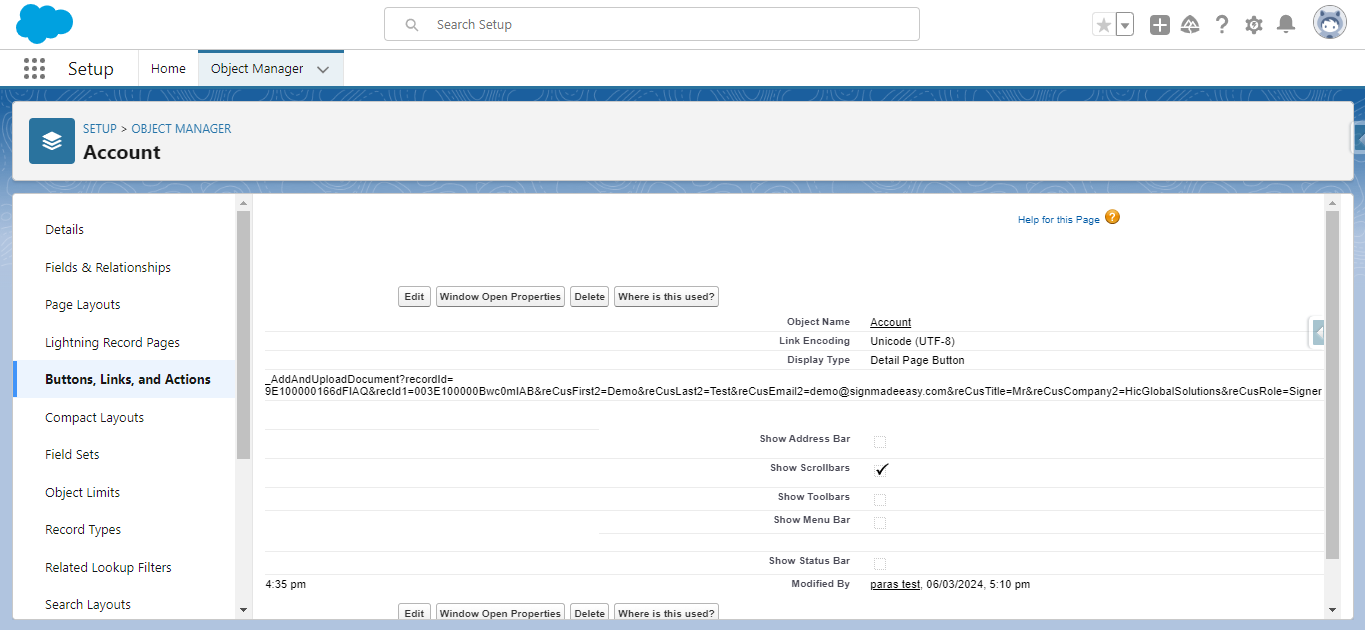
12: sendNow
Parameter Name : &sendNow
Parameter Description : Selection of SendNow (true) that your document automatically sends on the email.
Example : &sendNow
Ref : &sendNow=true
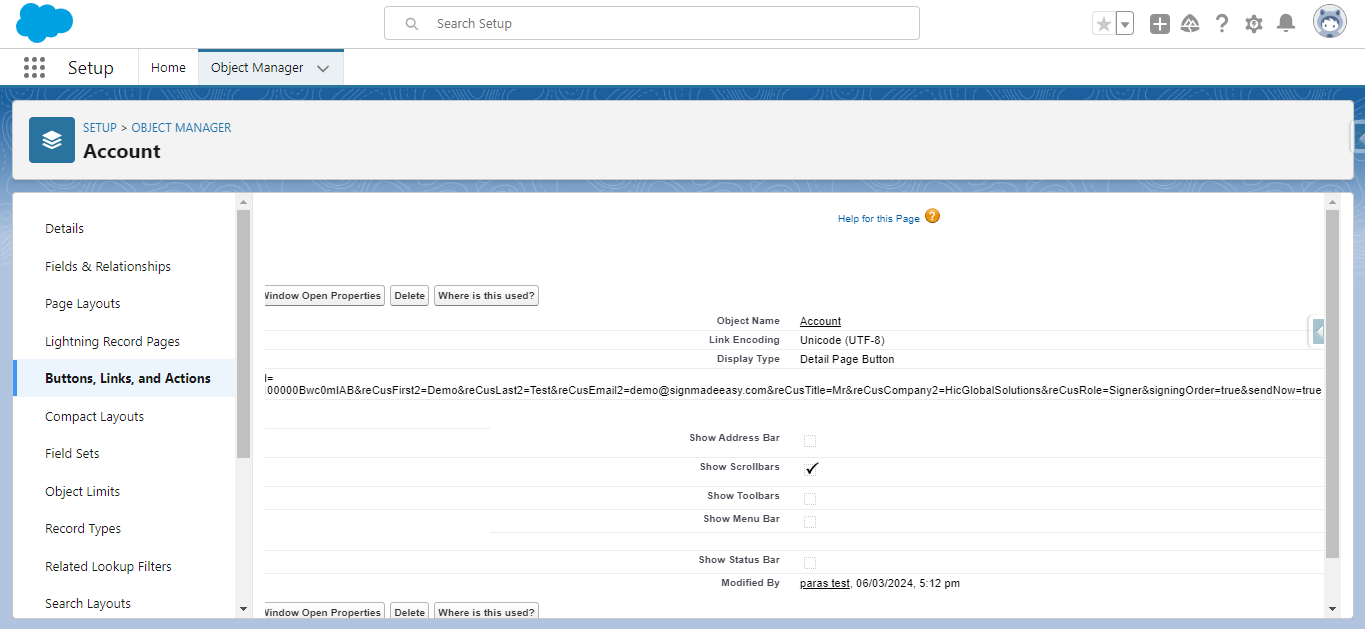
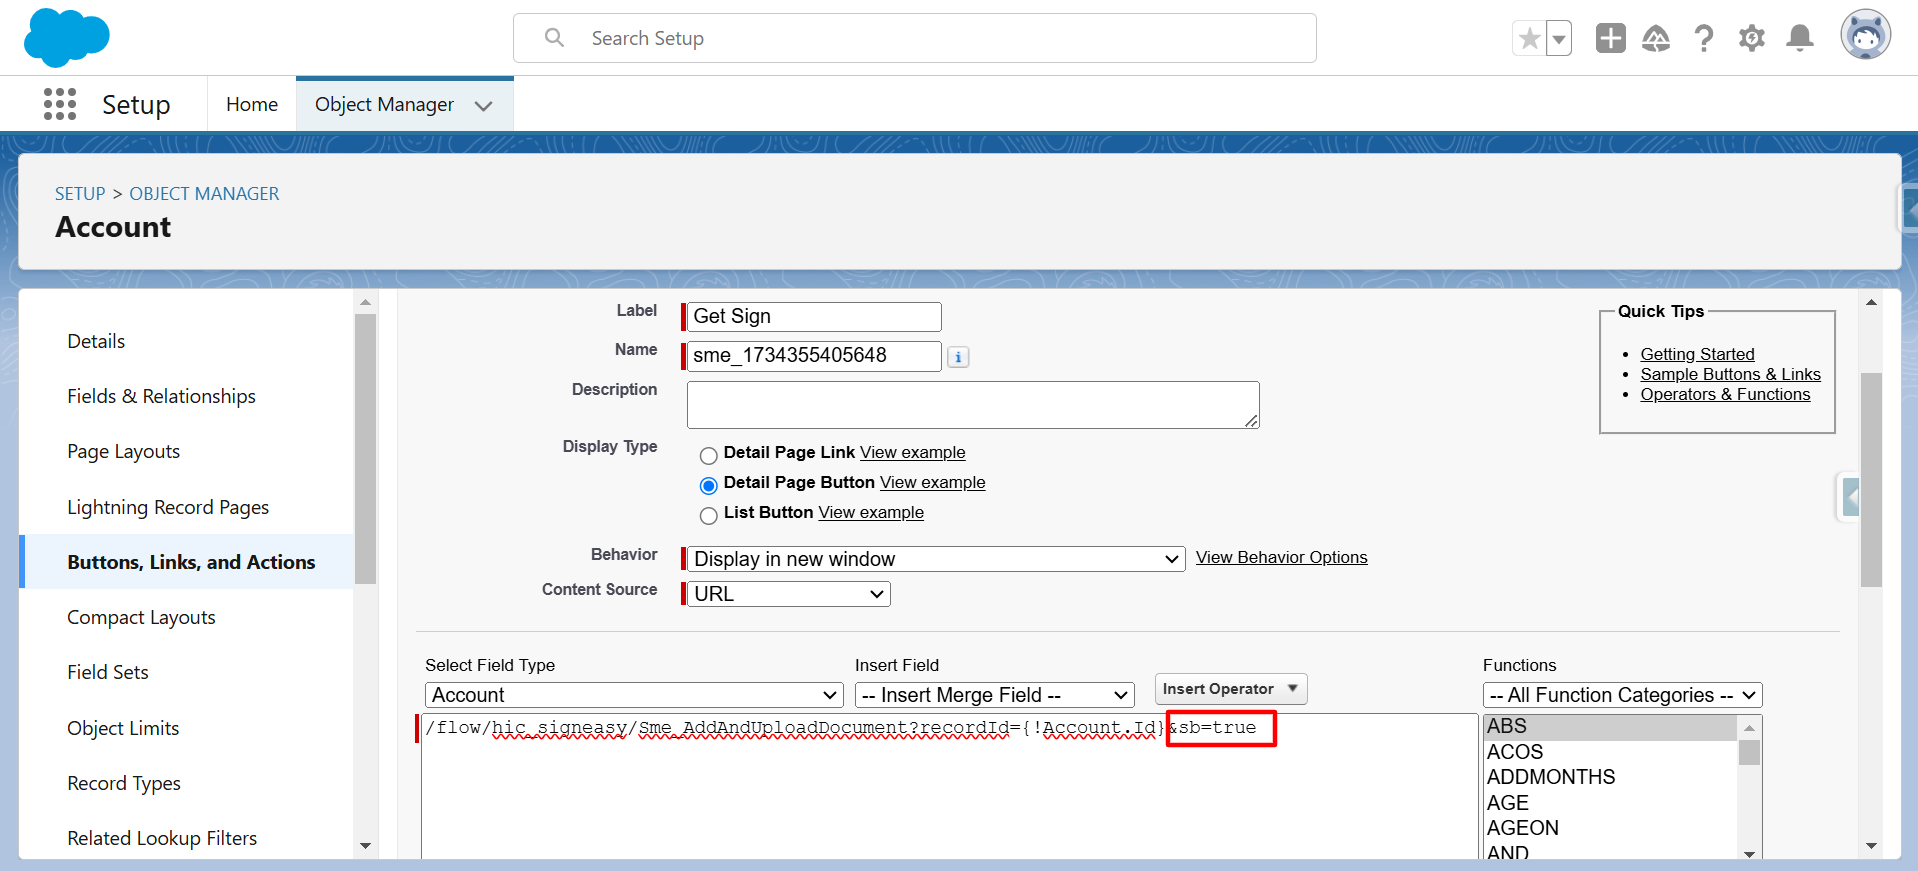
13: Save Completed Documents Back to Salesforce Record
Parameter Name : &sb
Parameter Description : First, we create a button, and then we add the parameter sb=(true) in the URL, then when we click that button, the checkbox is automatically checked.
Example : &sb
Ref : &sb=true
14: FileName
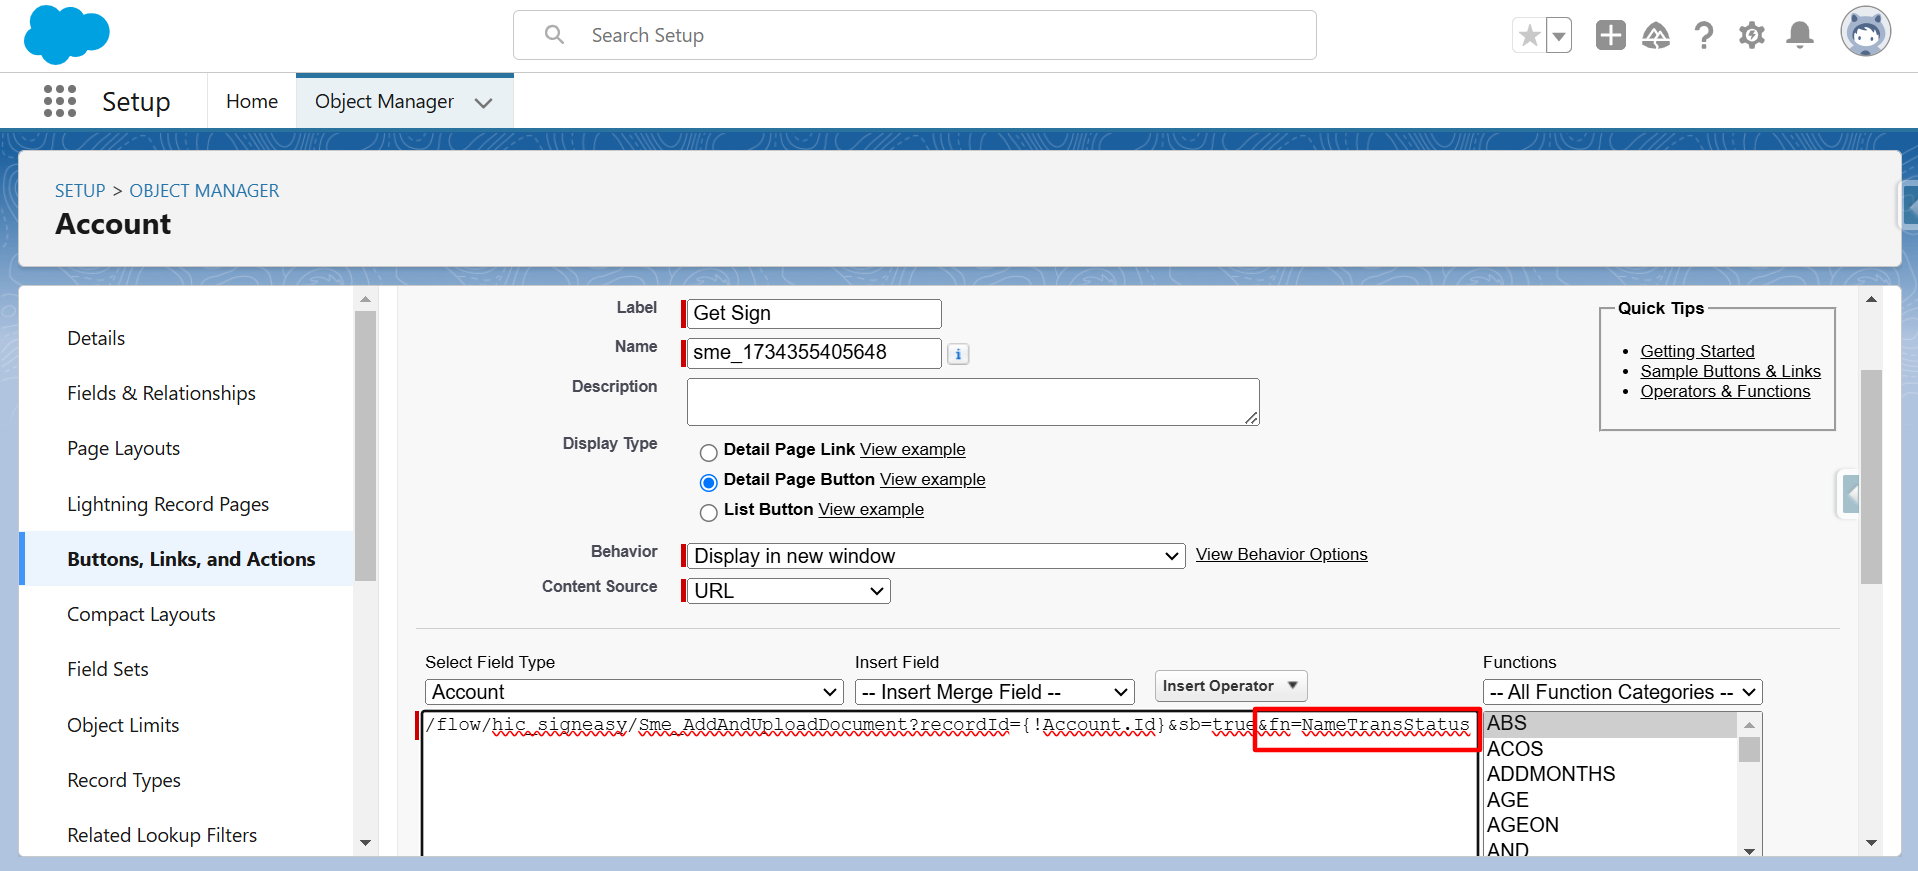
Parameter Name : &fn
Parameter Description : When we create a button, and then we can add the parameter filename=(NameTransStatus or Name) in the URL, then when we click that button, the checkbox is automatically checked. Users can select only one file name at one time.
Example : &fn
Ref : &fn=NameTransStatus\Name
15: Message
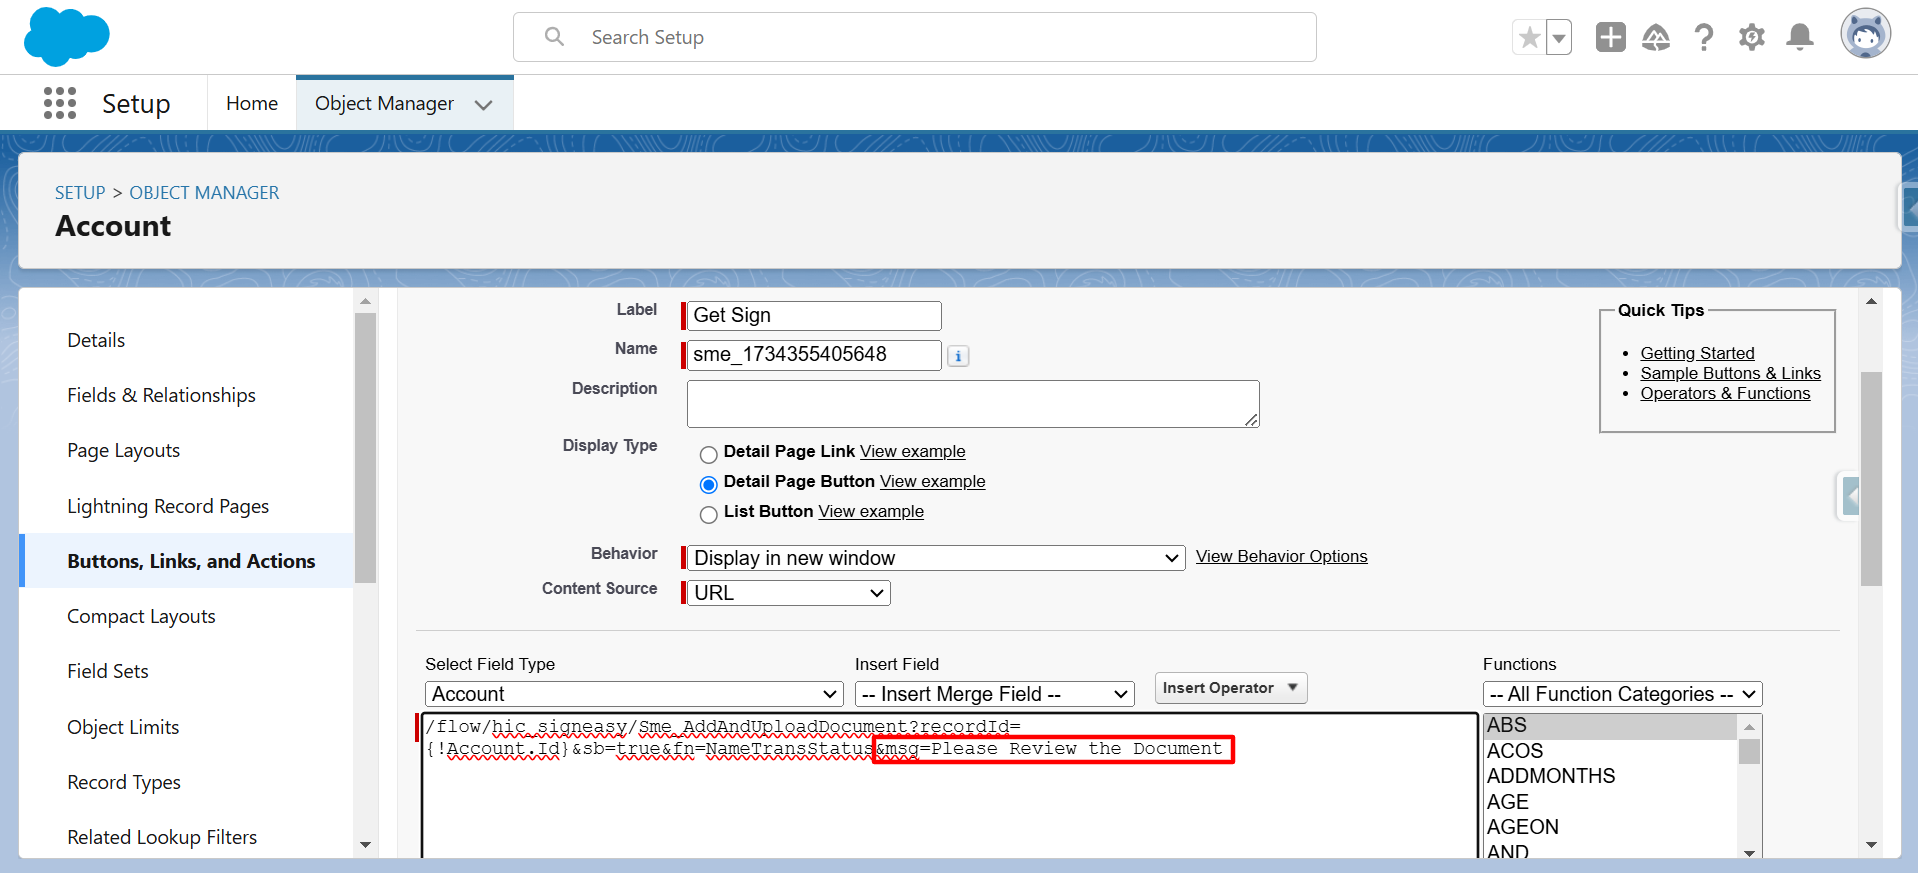
Parameter Name : &msg
Parameter Description : When we create a button, and then we can add the parameter message=(please sign the document), in the URL, then when we click that button. Then, in the message box, the message will be automatically reflected.
Example : &msg
Ref : &msg=Please sign the Document
16: Subject
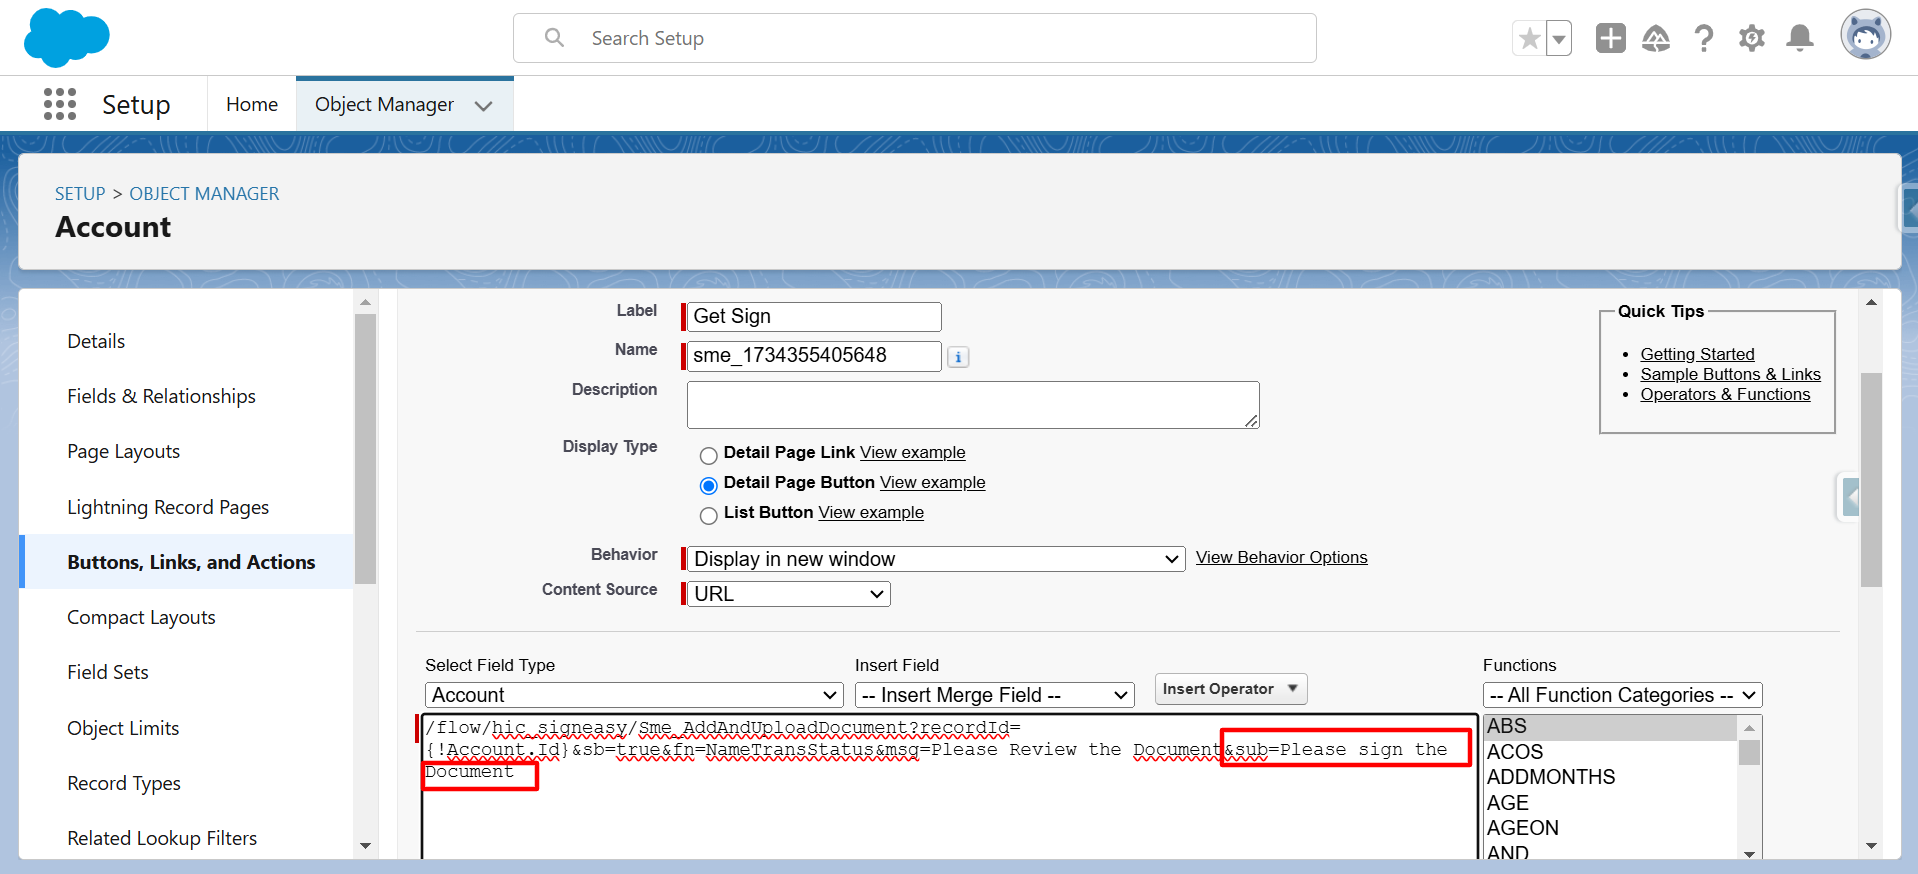
Parameter Name : &sub
Parameter Description : When we create a button, and then we can add the parameter subject=(please review the document), in the URL, then when we click that button. Then, in the subject box, the message will be automatically reflected.
Example : &sub
Ref : &sub=Please review the Document
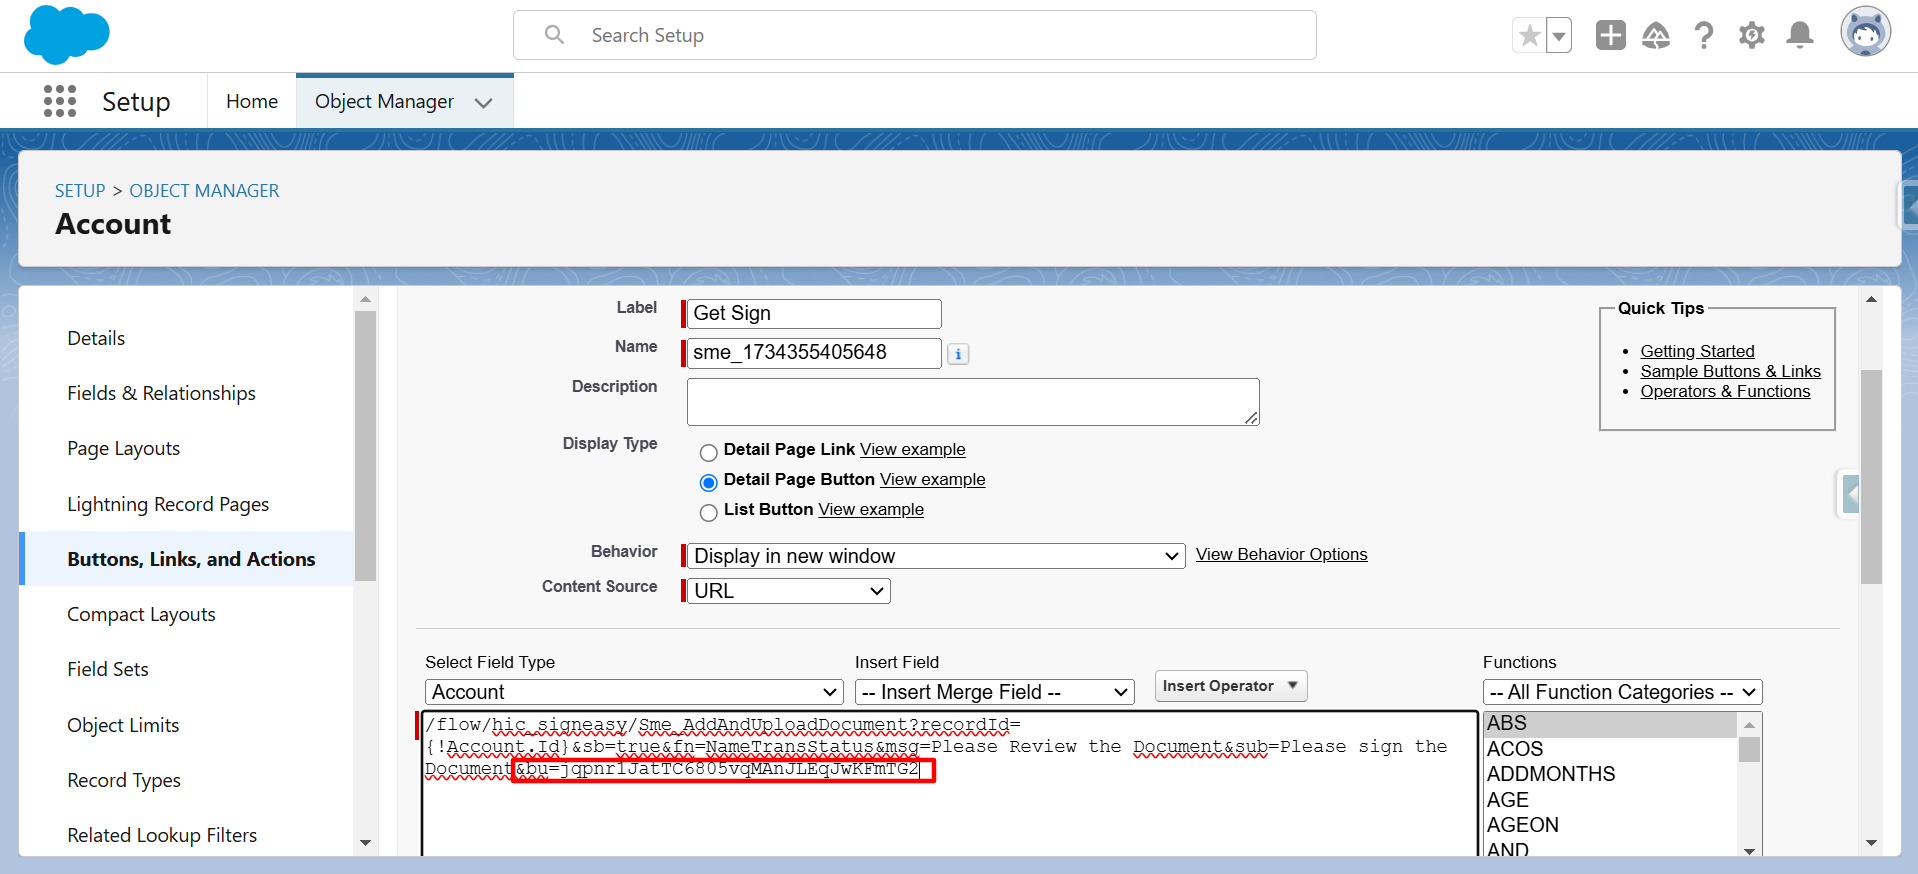
17: Business Unit
Available In: Sign Made Easy Pro
Parameter Name : &bu
Example : &bu
Parameter Description : When we create a button, and then we can add the parameter bu=vlfstsacScCJdykaFg7C3CFlKkyAjd2y in the URL. Then, in the choose business unit box, it will be automatically reflected.
Ref : &bu=vlfstsacScCJdykaFg7C3CFlKkyAjd2y
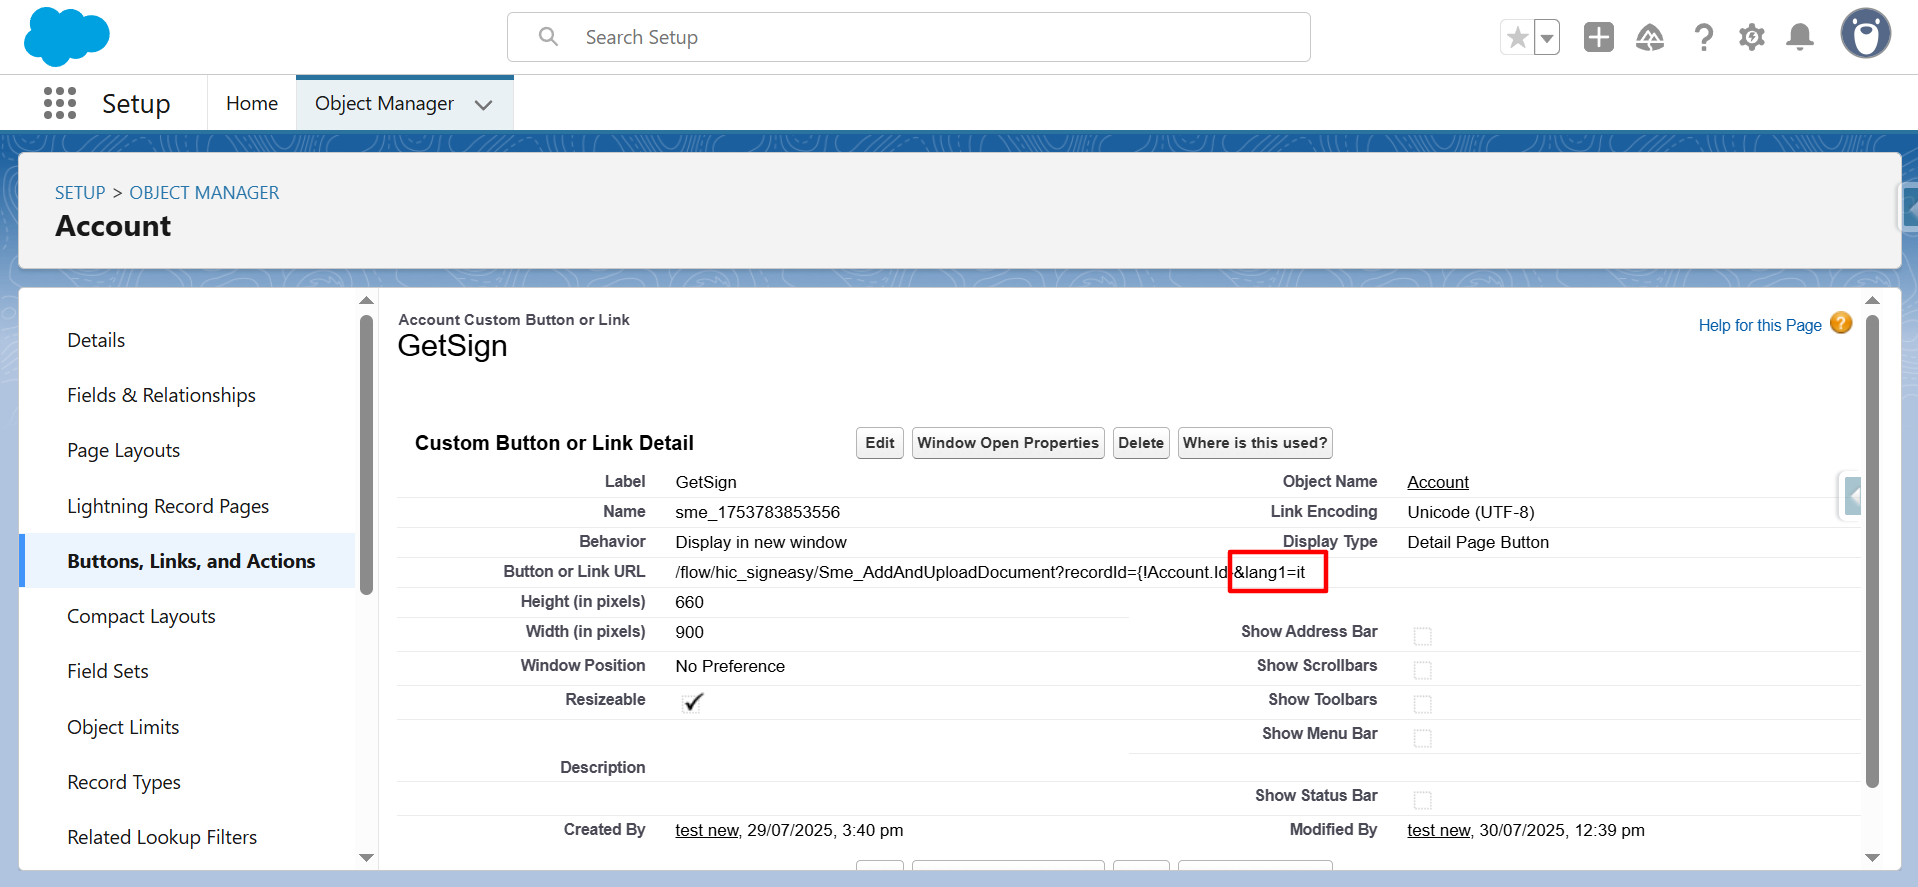
18: Language
Available In: Sign Made Easy Pro
Parameter Name : &lang
Example : &lang
Parameter Description : When we create a button, and then we can add the parameter lang=it, in the URL . Then, in the selected recipient, it will be automatically reflected.
Ref : &lang=it
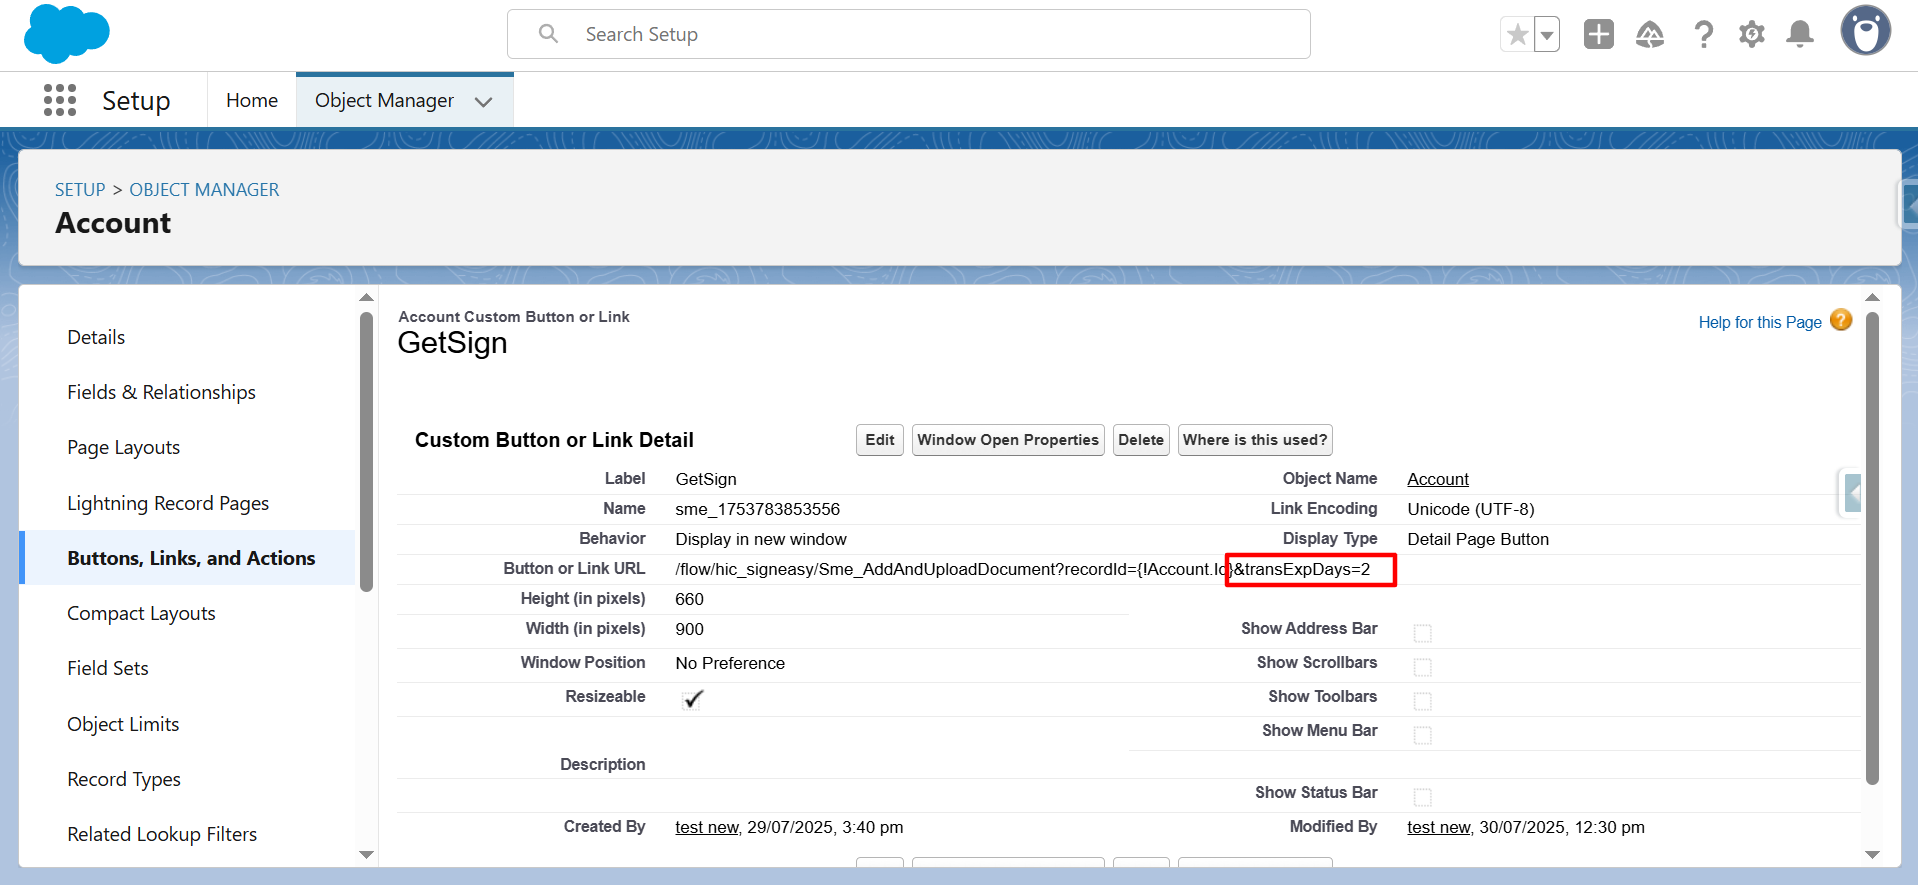
19: Expiration
Parameter Name : &transExpDays
Example : &transExpDays
Parameter Description : When we create a button, and then we can add the parameter &transExpDays=2 in the URL. Then, it will be automatically reflected.
Ref : &transExpDays=2
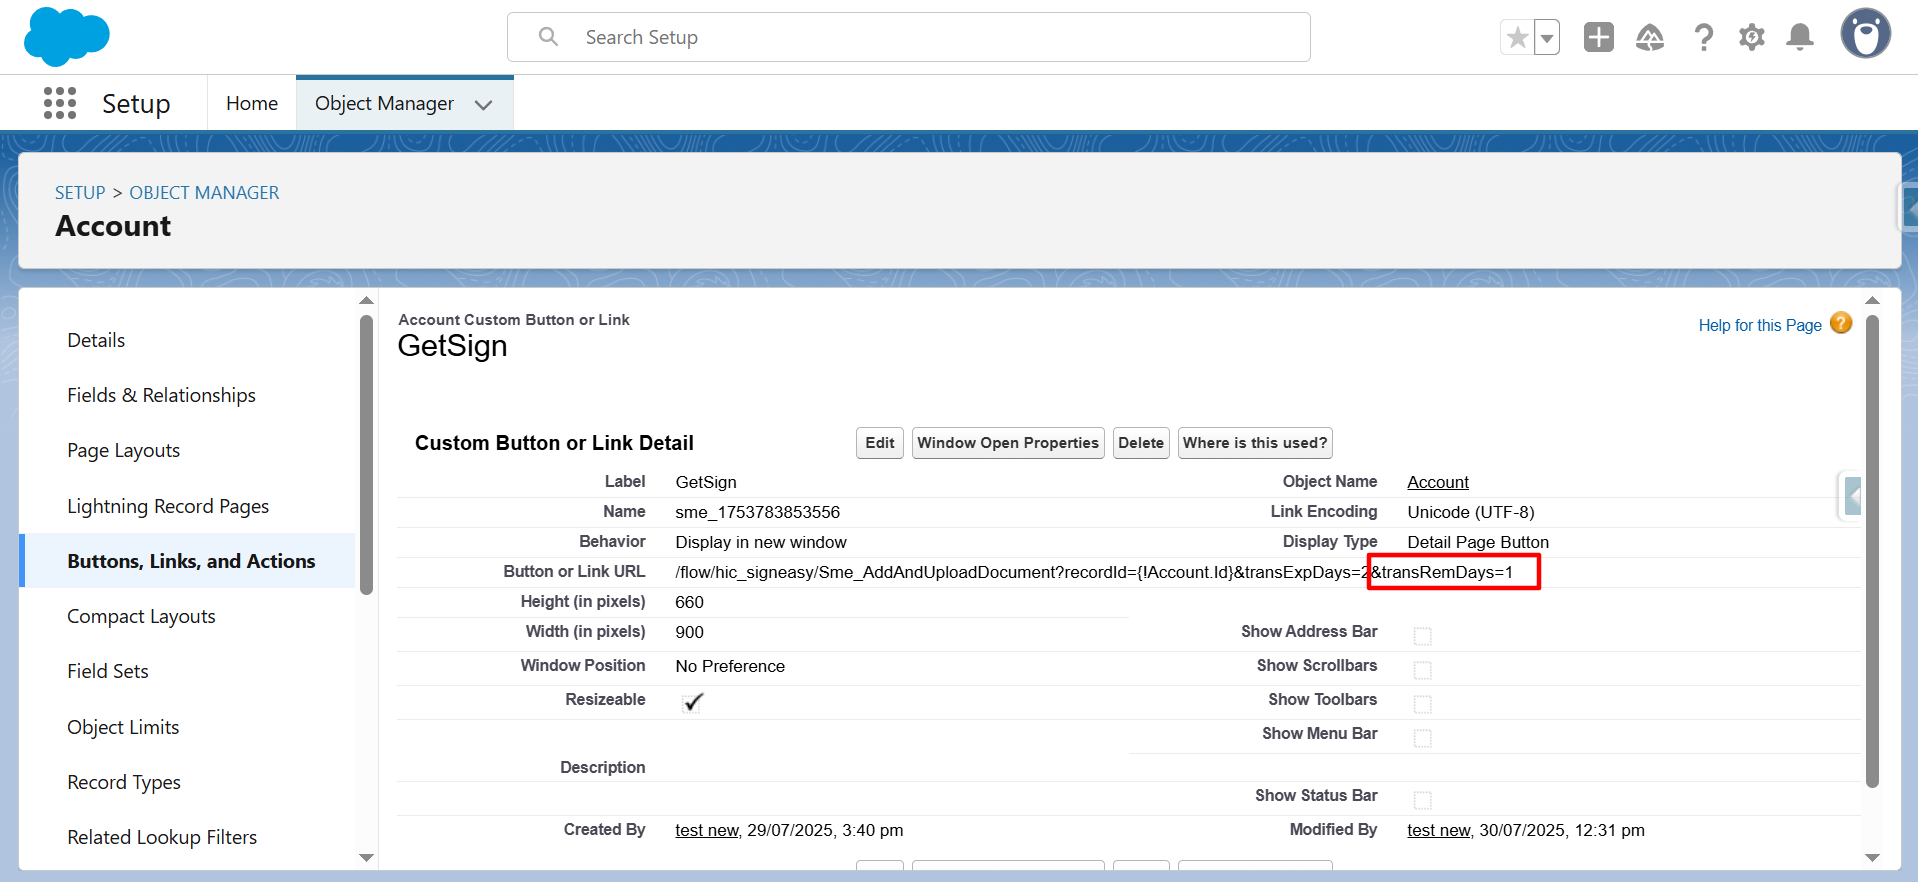
Parameter Name : &transRemDays
Example : &transRemDays
Parameter Description : When we create a button, and then we can add the parameter &transRemDays=1 in the URL. Then, it will be automatically reflected.
Ref : &transRemDays=1
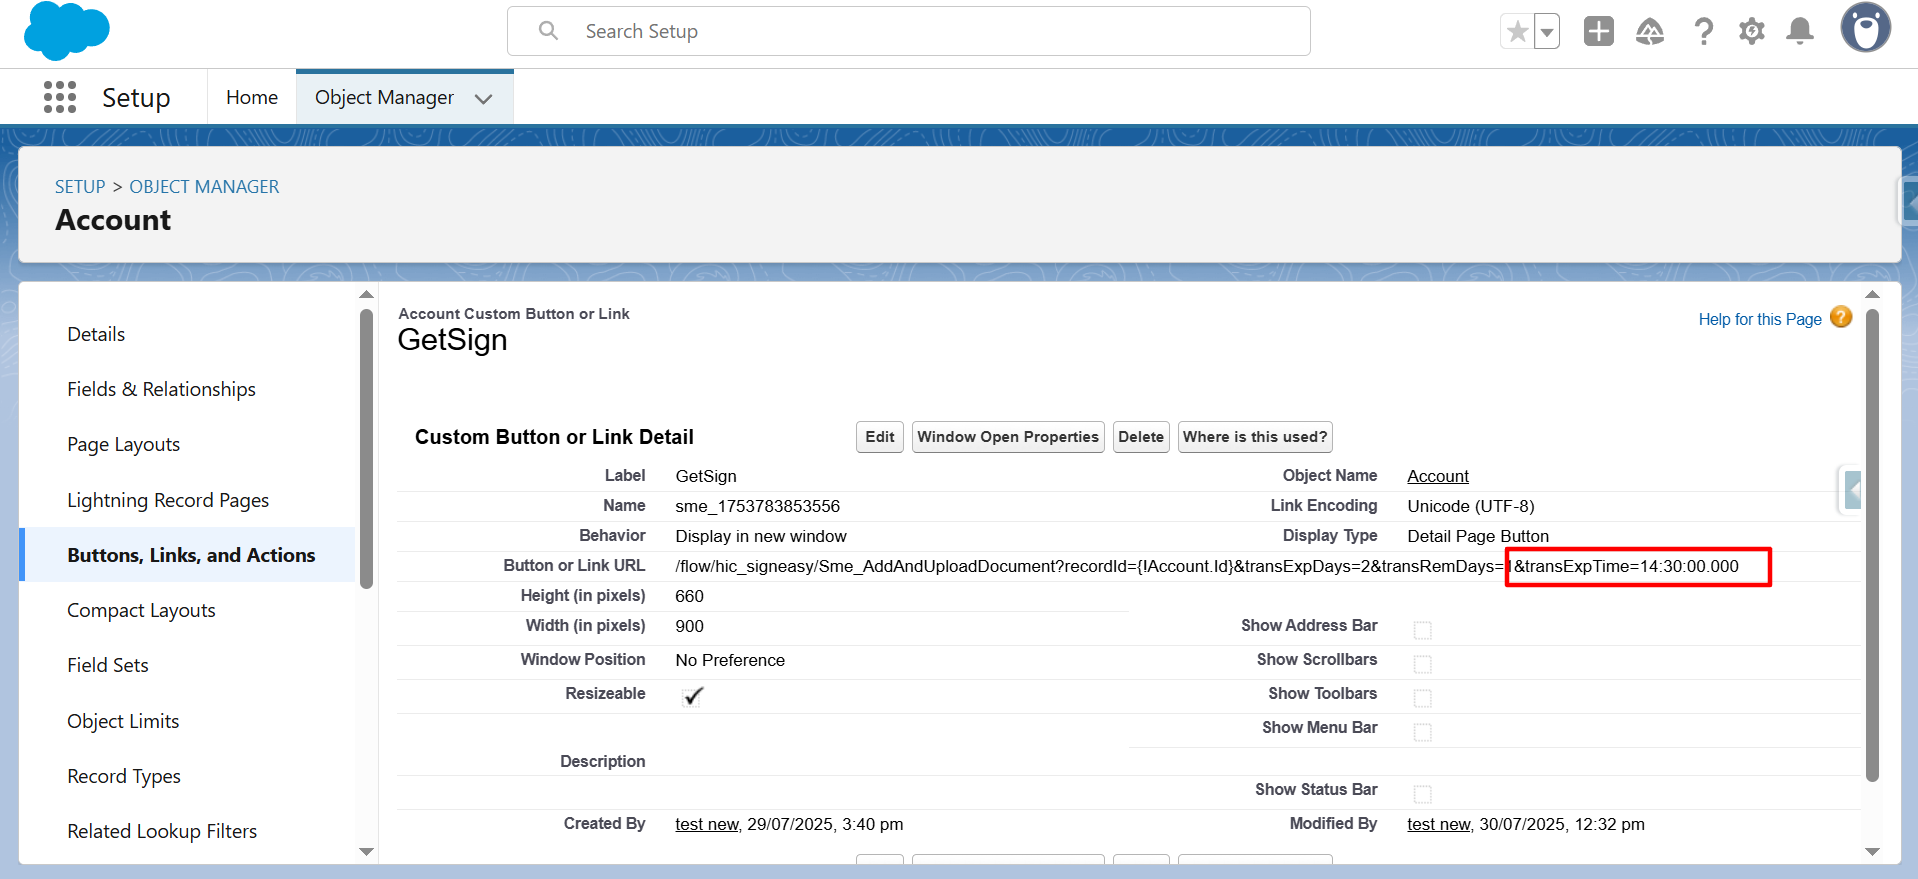
Parameter Name : &transExpTime
Example : &transExpTime
Parameter Description : When we create a button, and then we can add the parameter &transExpTime=14:30:00.000 in the URL. Then, it will be automatically reflected.
Ref : &transExpTime=14:30:00.000
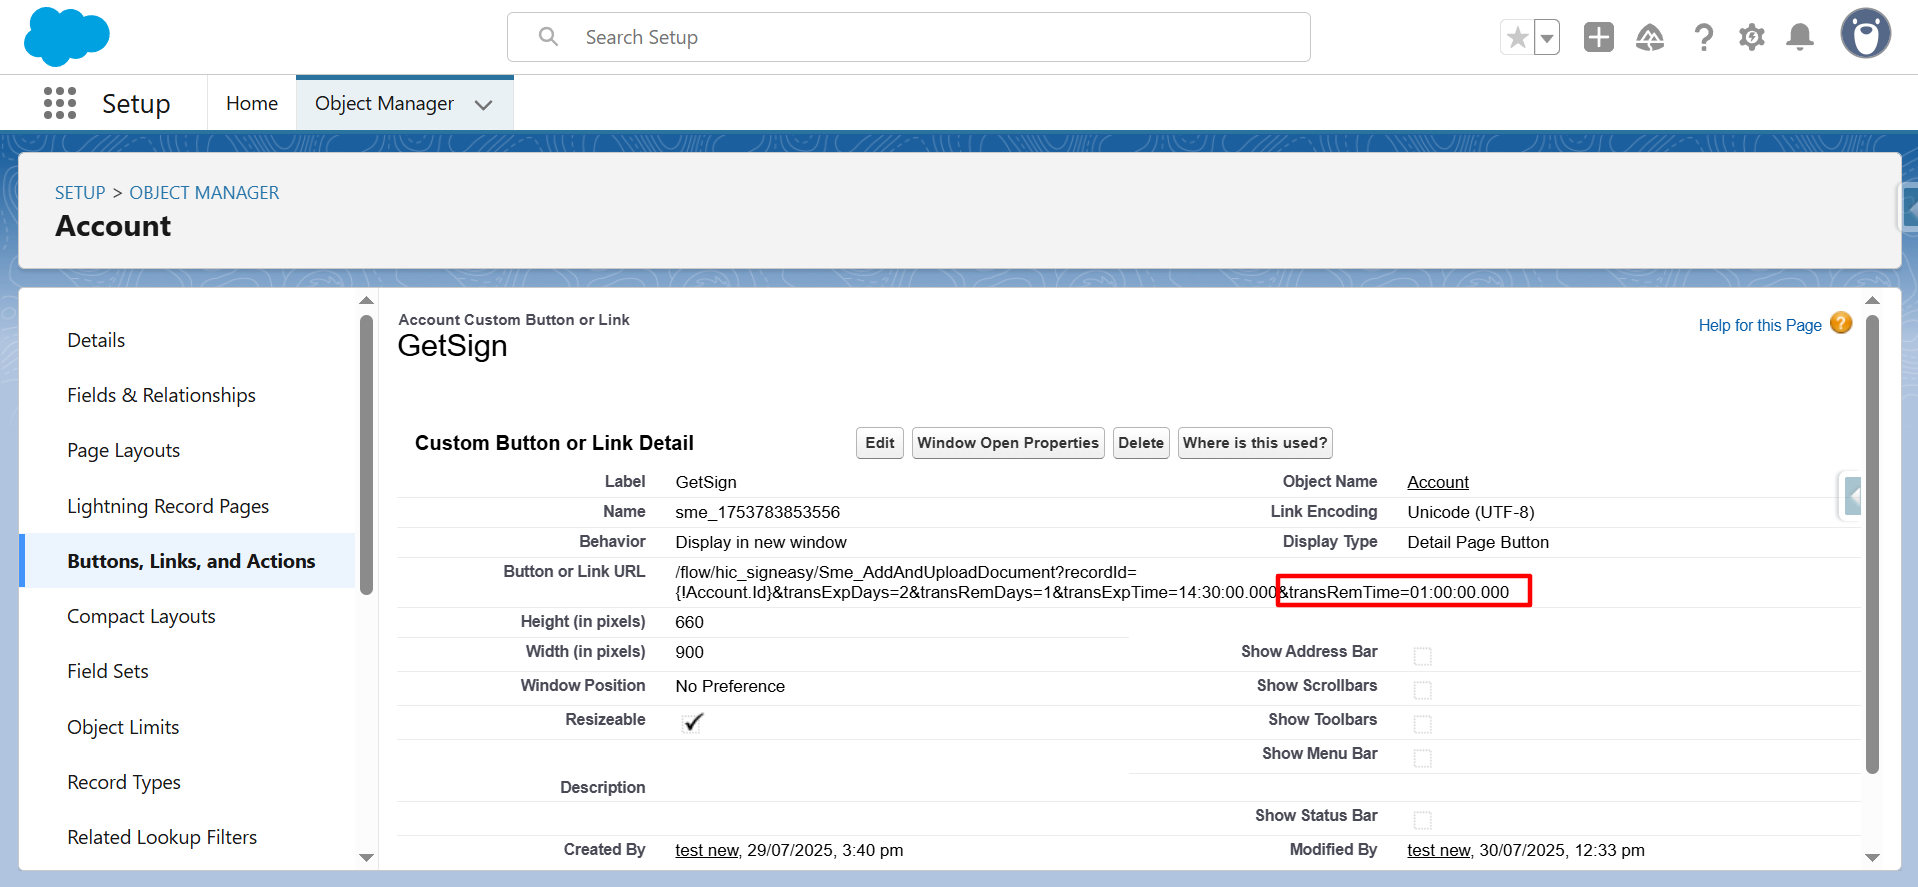
Parameter Name : &transRemTime
Example : &transRemTime
Parameter Description : When we create a button, and then we can add the parameter &transRemTime=01:00:00.000 in the URL. Then, it will be automatically reflected.
Ref : &transRemTime=01:00:00.000
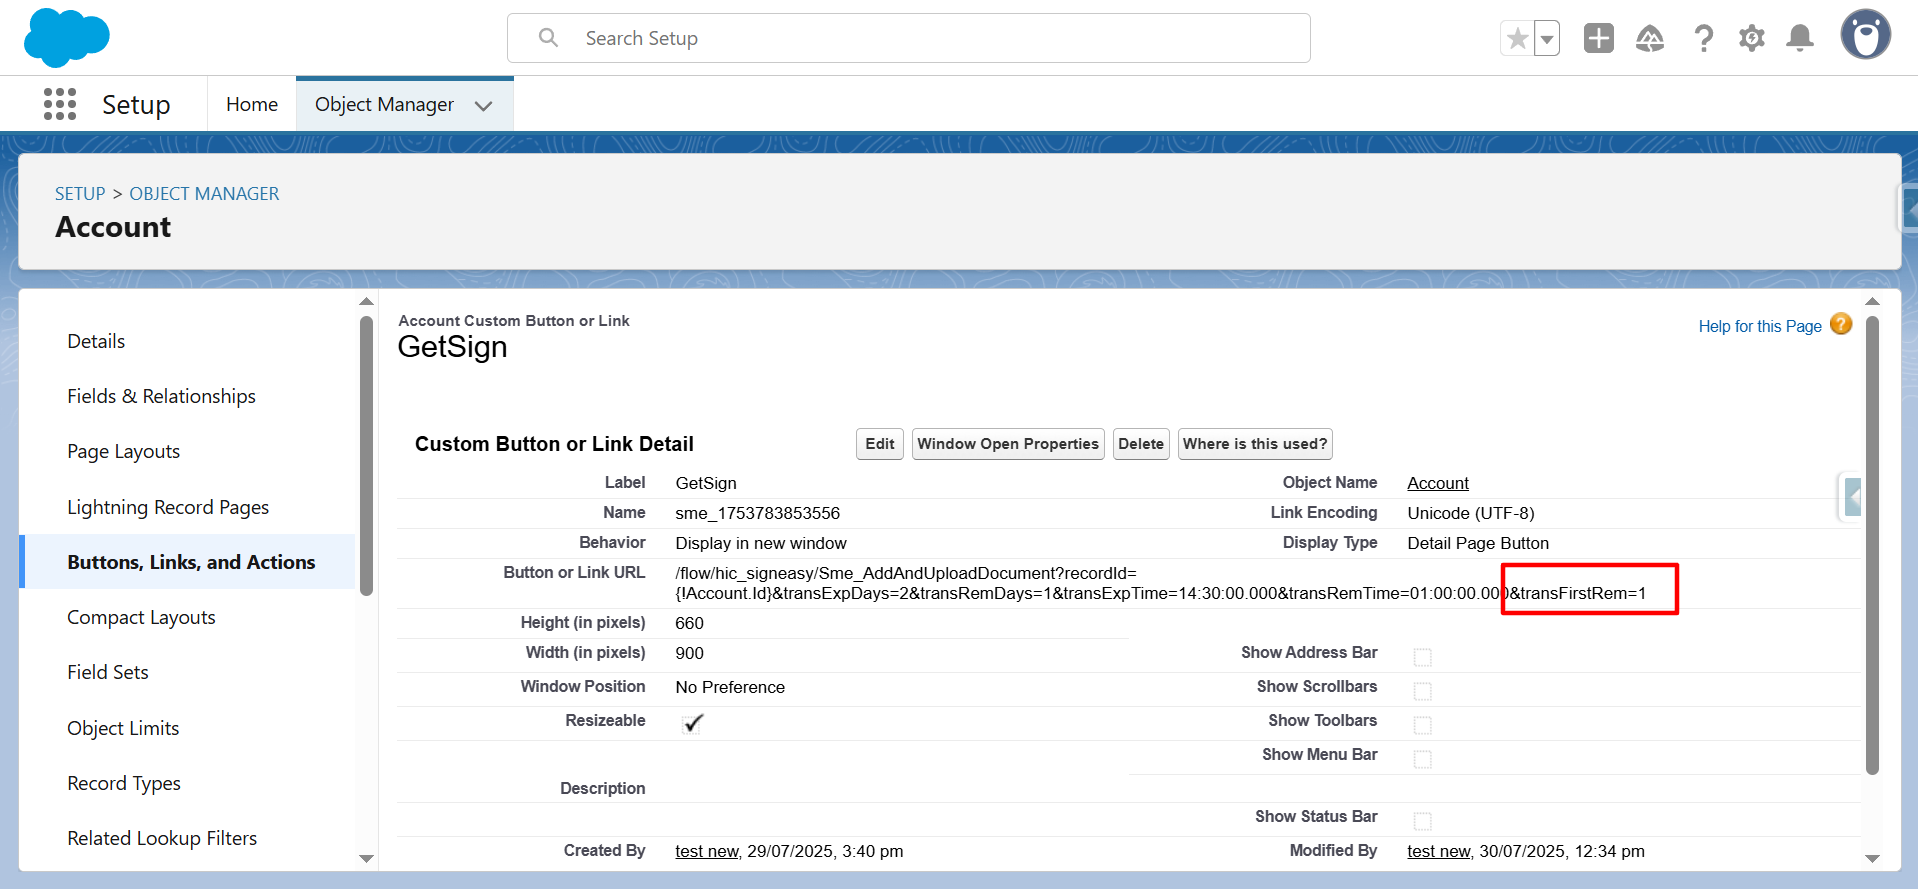
Parameter Name : &transFirstRem
Example : &transFirstRem
Parameter Description : When we create a button, and then we can add the parameter &transFirstRem=1 in the URL. Then, it will be automatically reflected.
Ref : &transFirstRem=1
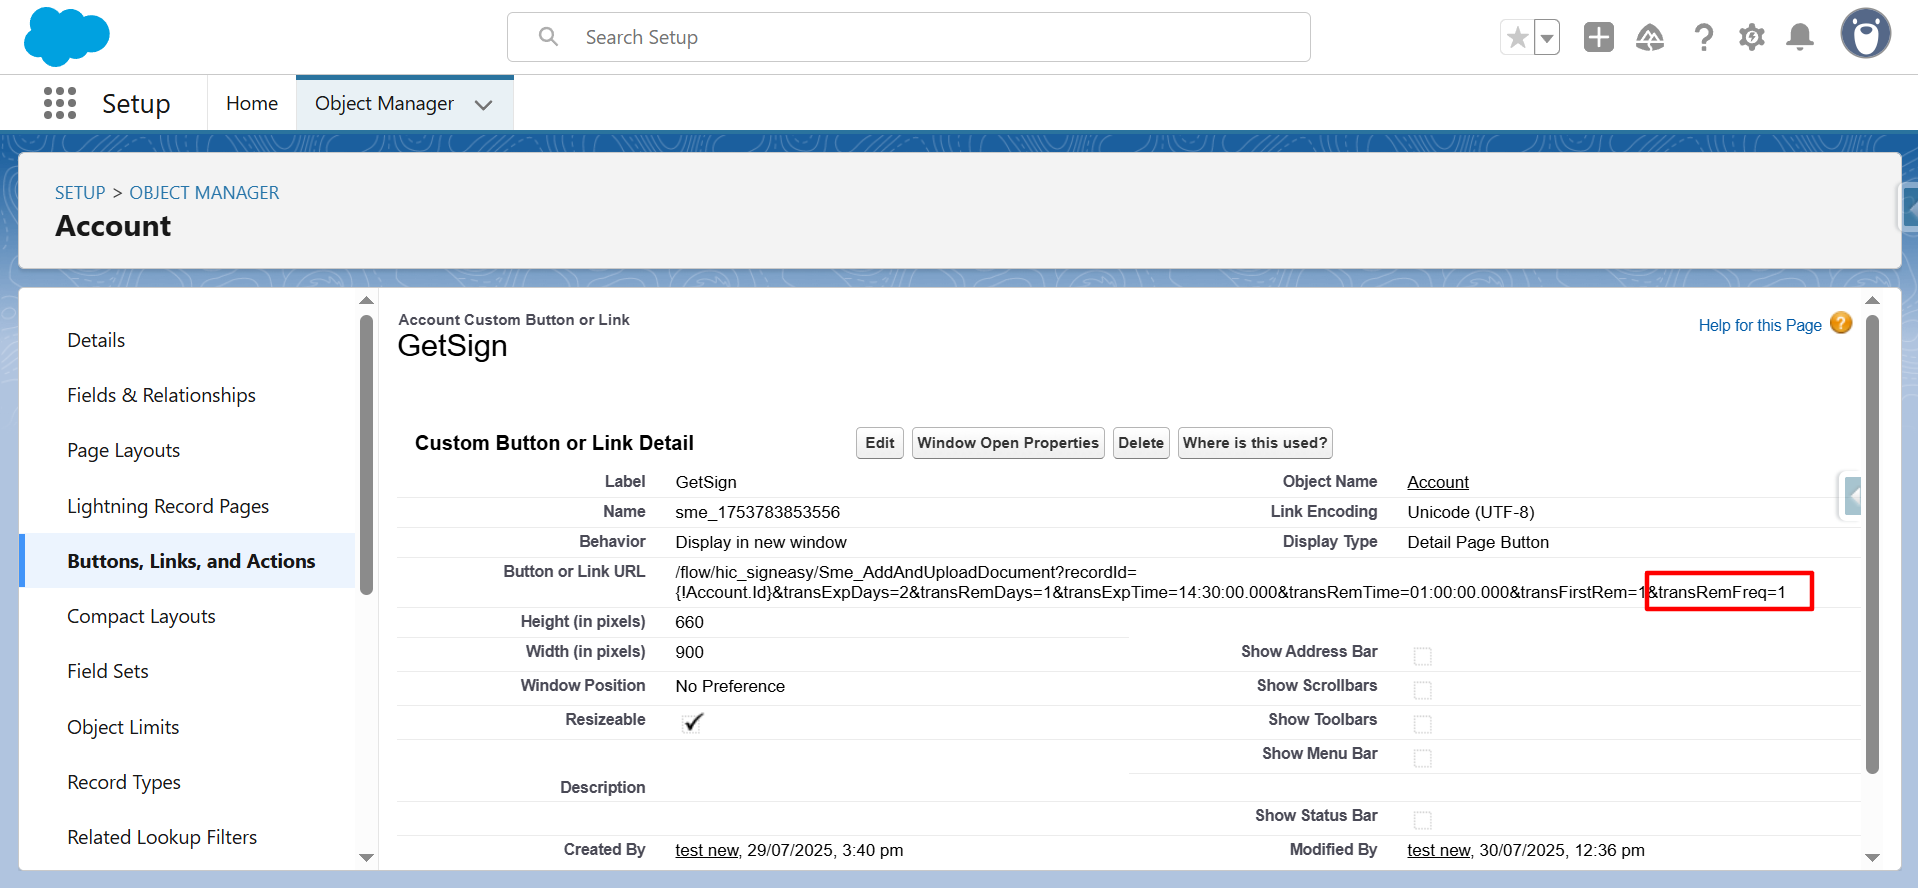
Parameter Name : &transRemFreq
Example : &transRemFreq
Parameter Description : When we create a button, and then we can add the parameter &transRemFreq=1 in the URL. Then, it will be automatically reflected.
Ref : &transRemFreq=1
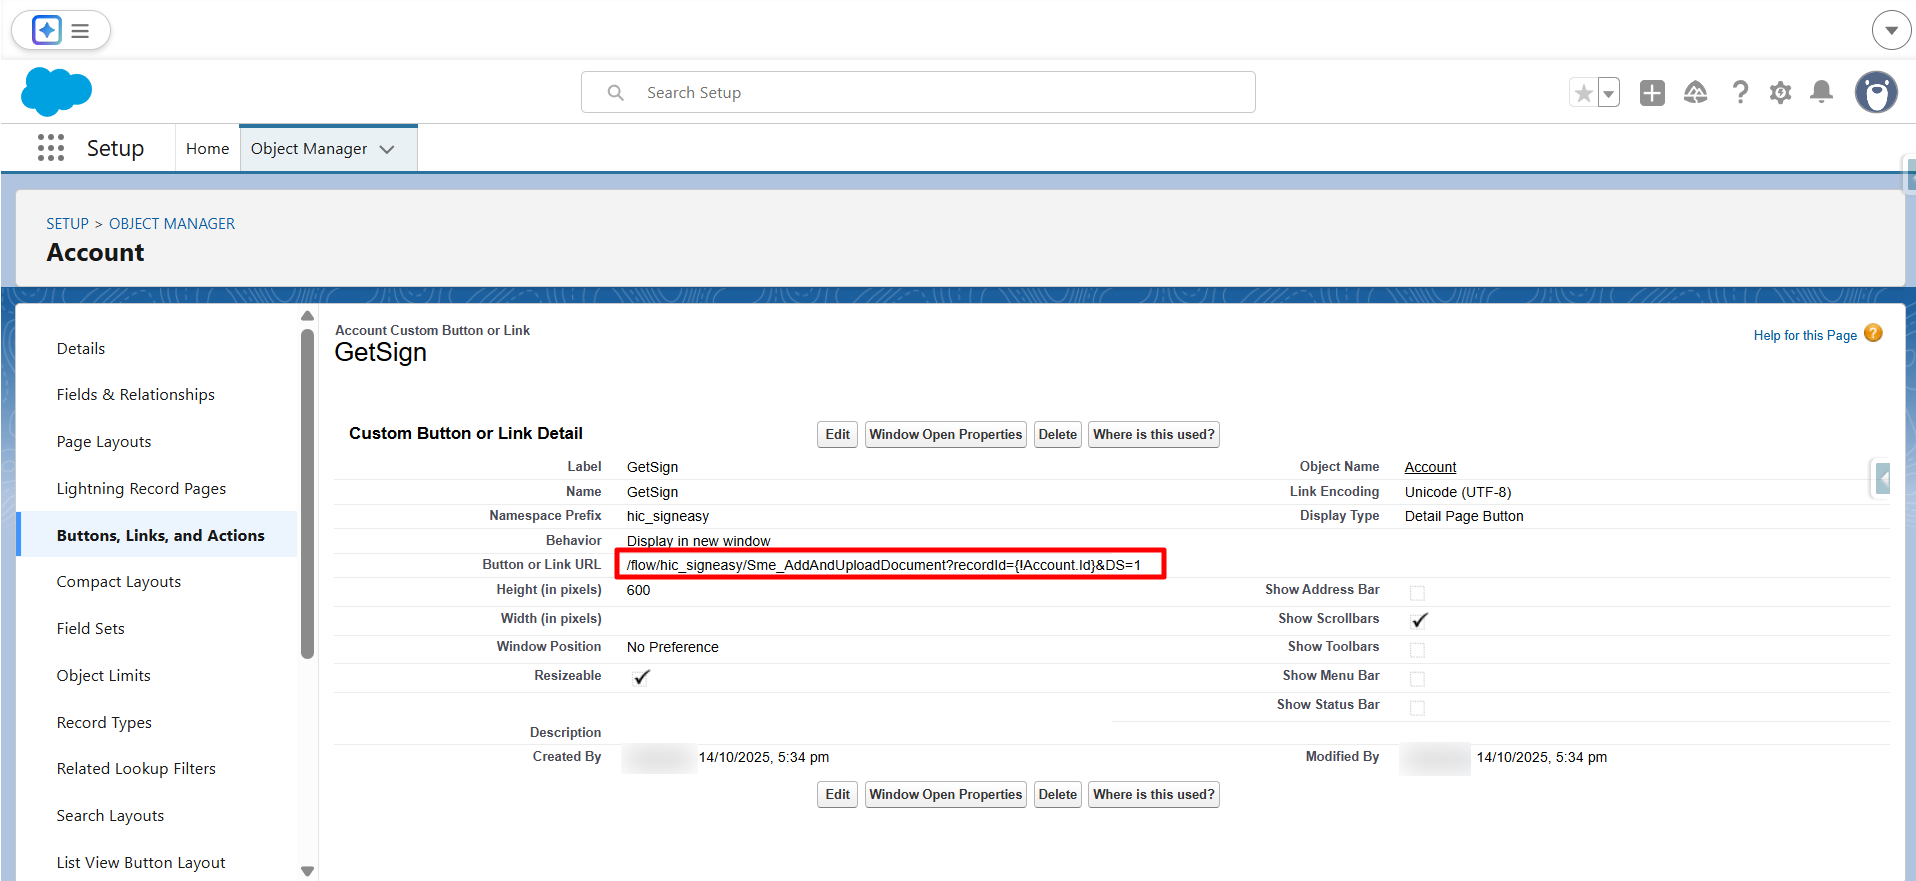
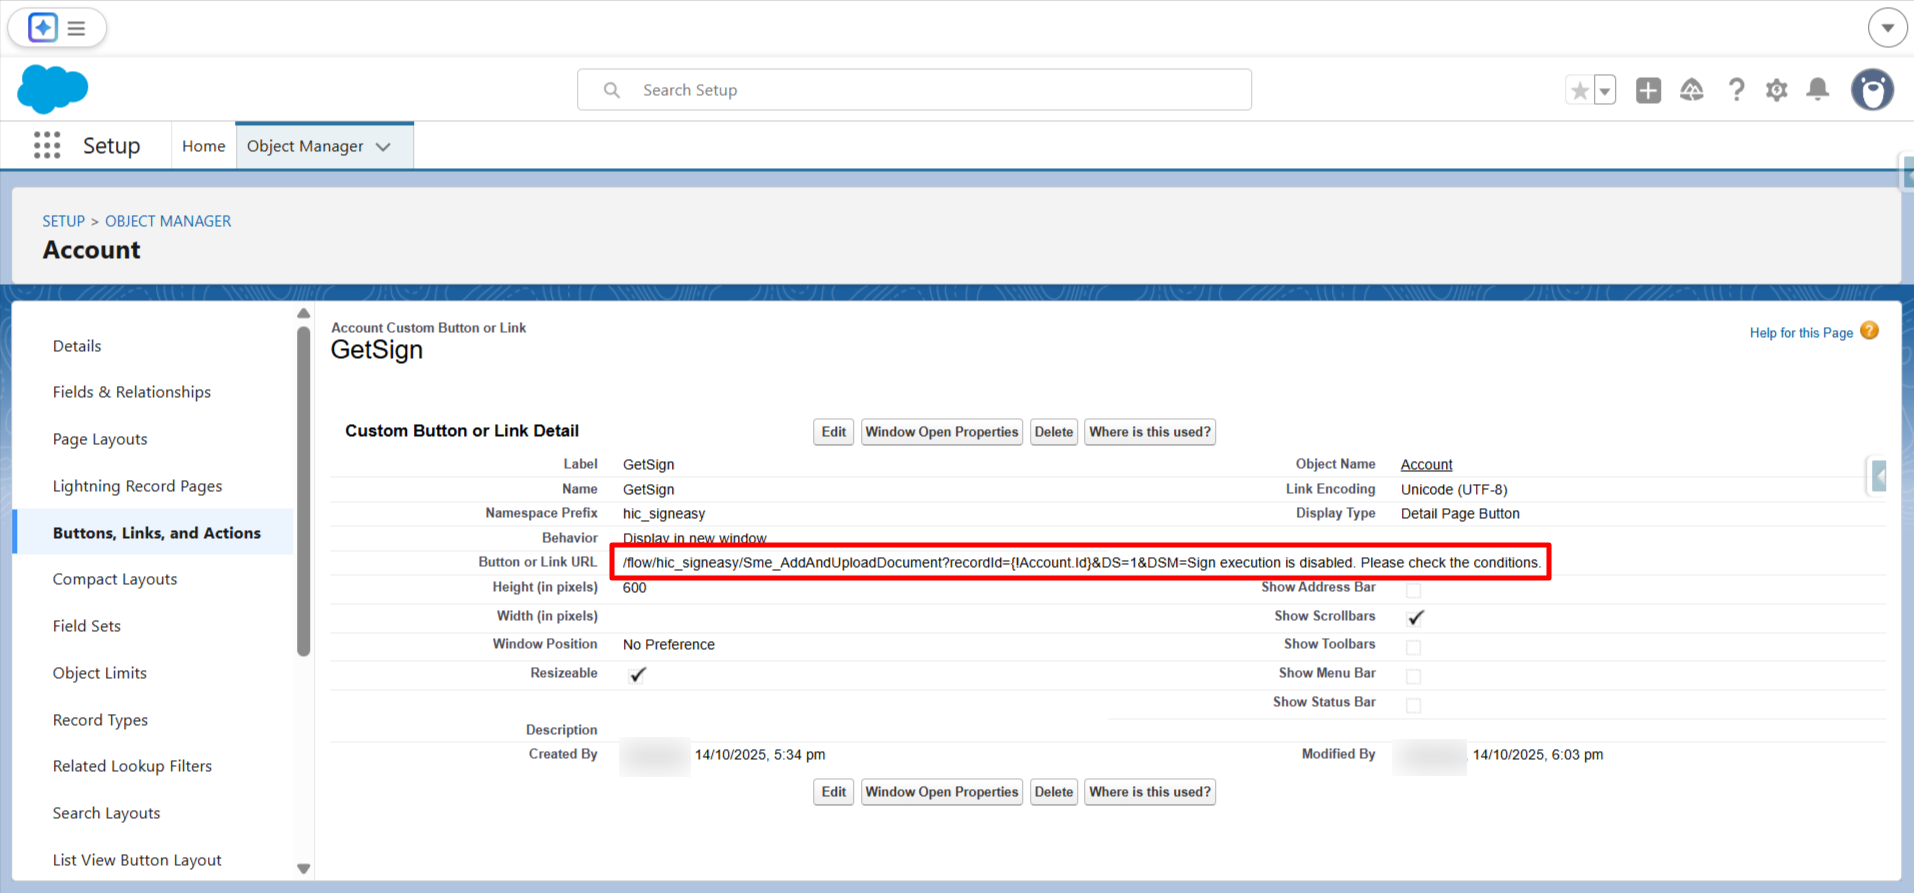
20: Disable Sign Parameter
Note: Both DS and DSM parameters can also be applied conditionally to tailor the e-signature behavior based on specific requirements.
Parameter Name: &DS=0 , &DS=1 , &DSM='Sign is Disabled'
Parameter Description: It is used to deactivate the e-signature functionality by assigning the DS and DSM parameters in the SME Button URL. This ensures that the electronic signature option is disabled for the associated document or workflow.
DS=1 → Disable e-signature option
DS=0 → Enable e-signature option
DSM → Display a custom message when e-signature is disabled
Ref: &DS=1&DSM=Sign execution is disabled. Please check the conditions.
21: reCusAuthType
Parameter Name : &reCusAuthType
Parameter Description : This is used to select the authentication type for a custom recipient.
Example : &reCusAuthType1=email
Ref: &reCusAuthType 1=(email/sms/whatsapp/passcode/none)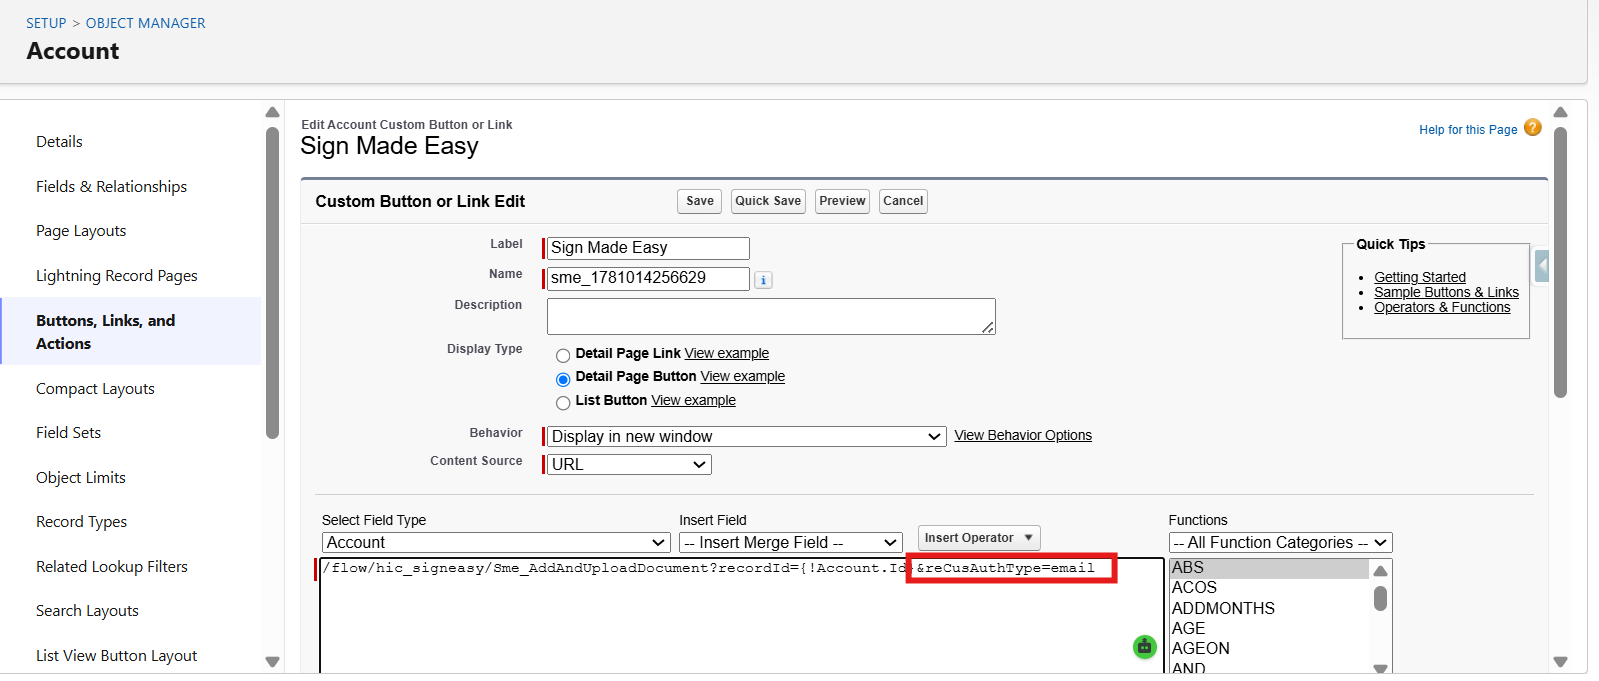
22: authType
Parameter Name : &authType
Parameter Description : This is used to select the authentication type for a standard recipient.
Example : &authType1=sms
Ref: &authType1=(email/sms/whatsapp/passcode/none)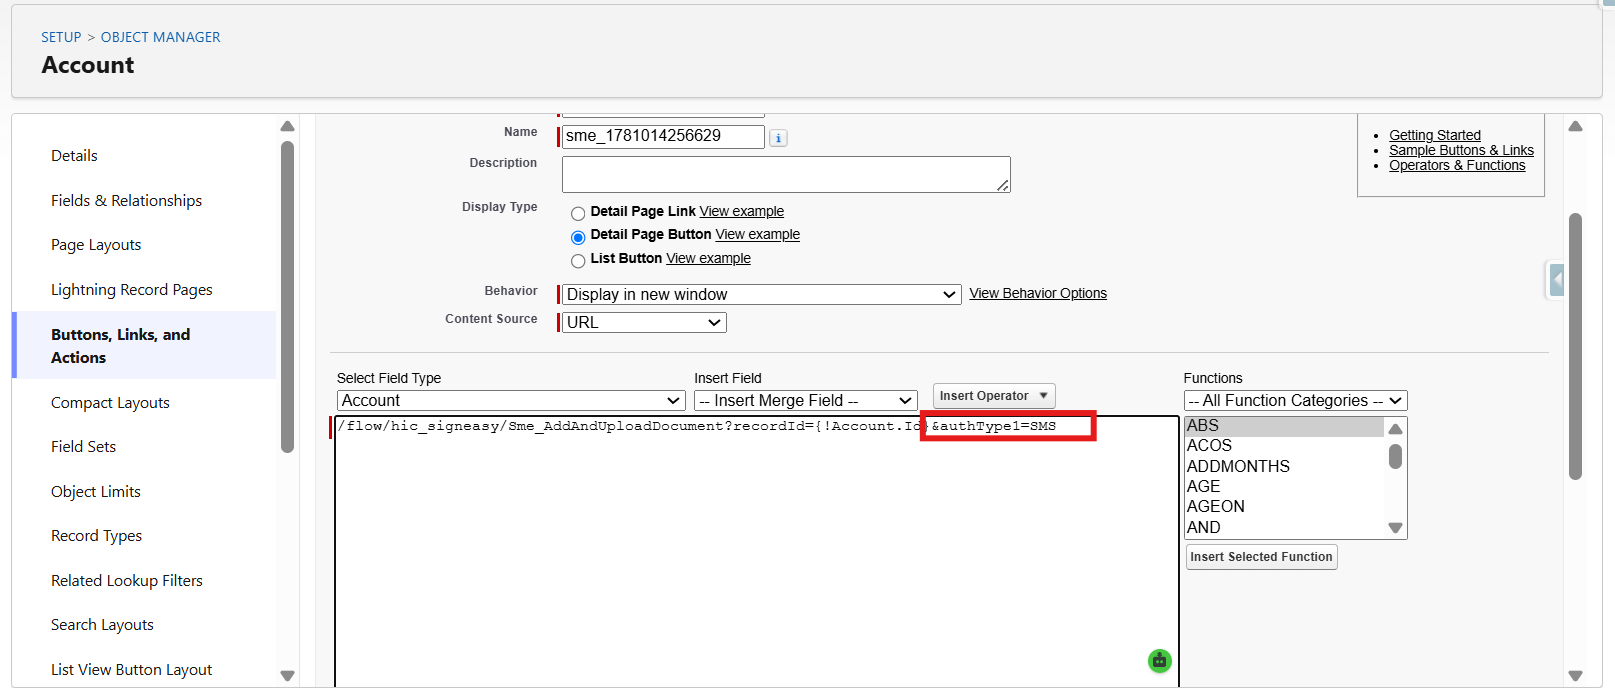
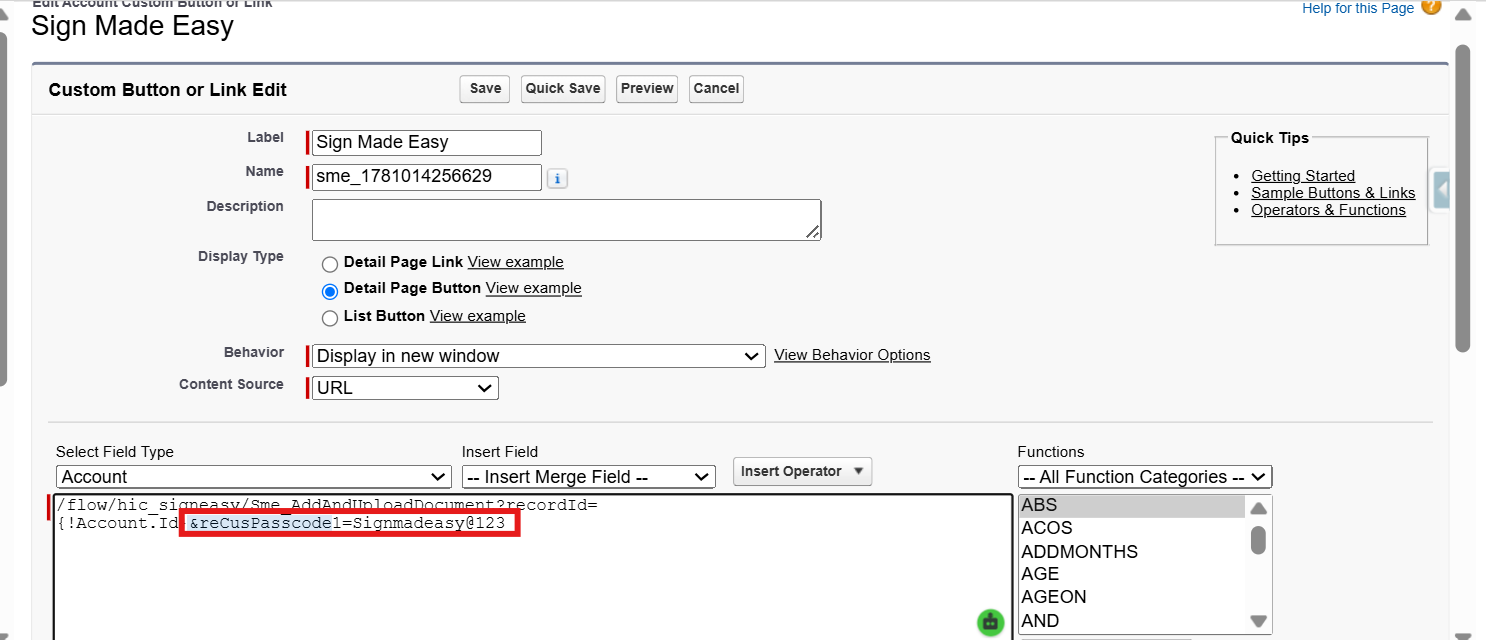
23: reCusPasscode
Parameter Name : &reCusPasscode
Parameter Description : This parameter is used to set a custom passcode for the custom recipient.
Example : &reCusPasscode1=Signmadeasy@123
Note : The parameter is applicable only when Passcode is selected as the authentication type.
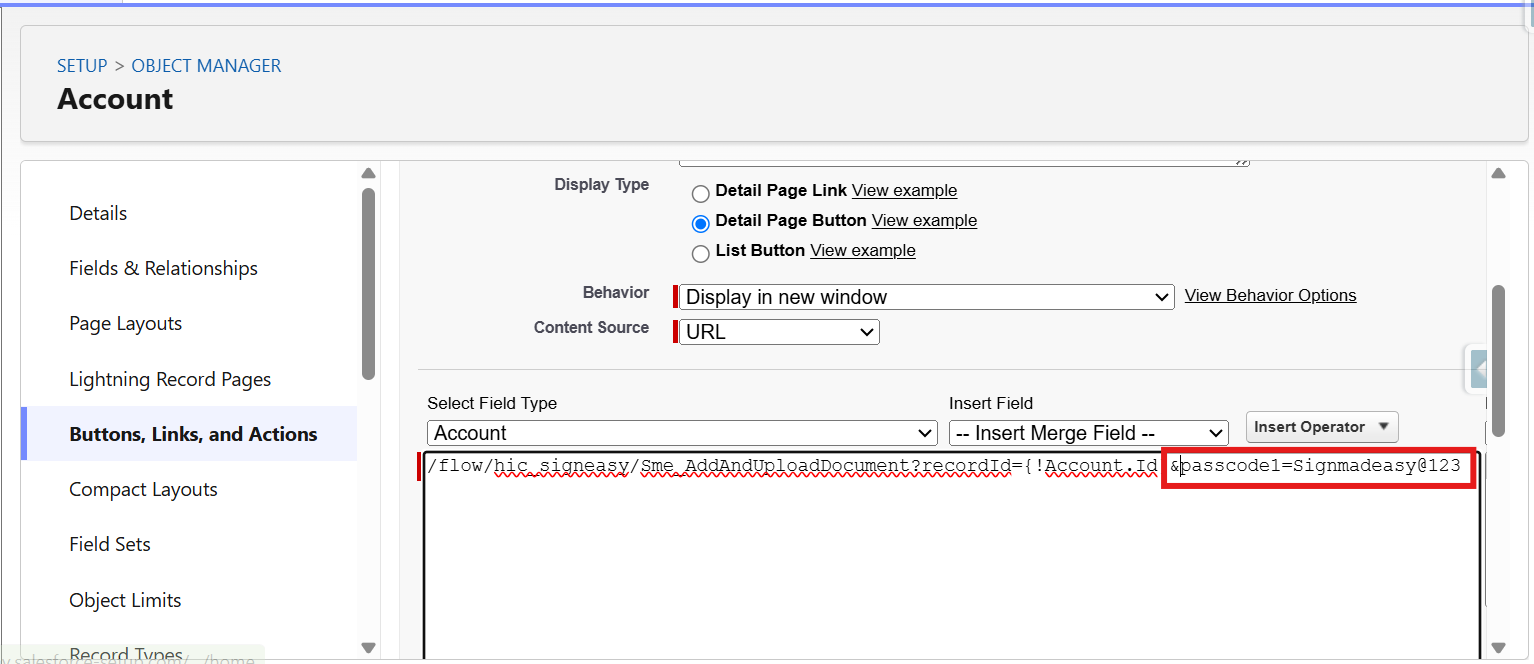
24: passcode
Parameter Name : &passcode
Parameter Description : This parameter is used to set a custom passcode for the standard recipient.
Example : &passcode1=Signmadeasy@123
Note : The parameter is applicable only when Passcode is selected as the authentication type.
25: reCusPhone
Parameter Name : &reCusPhone
Parameter Description : This parameter is used to set Phone Number for the custom recipient.
Example : &reCusPhone1=9876543210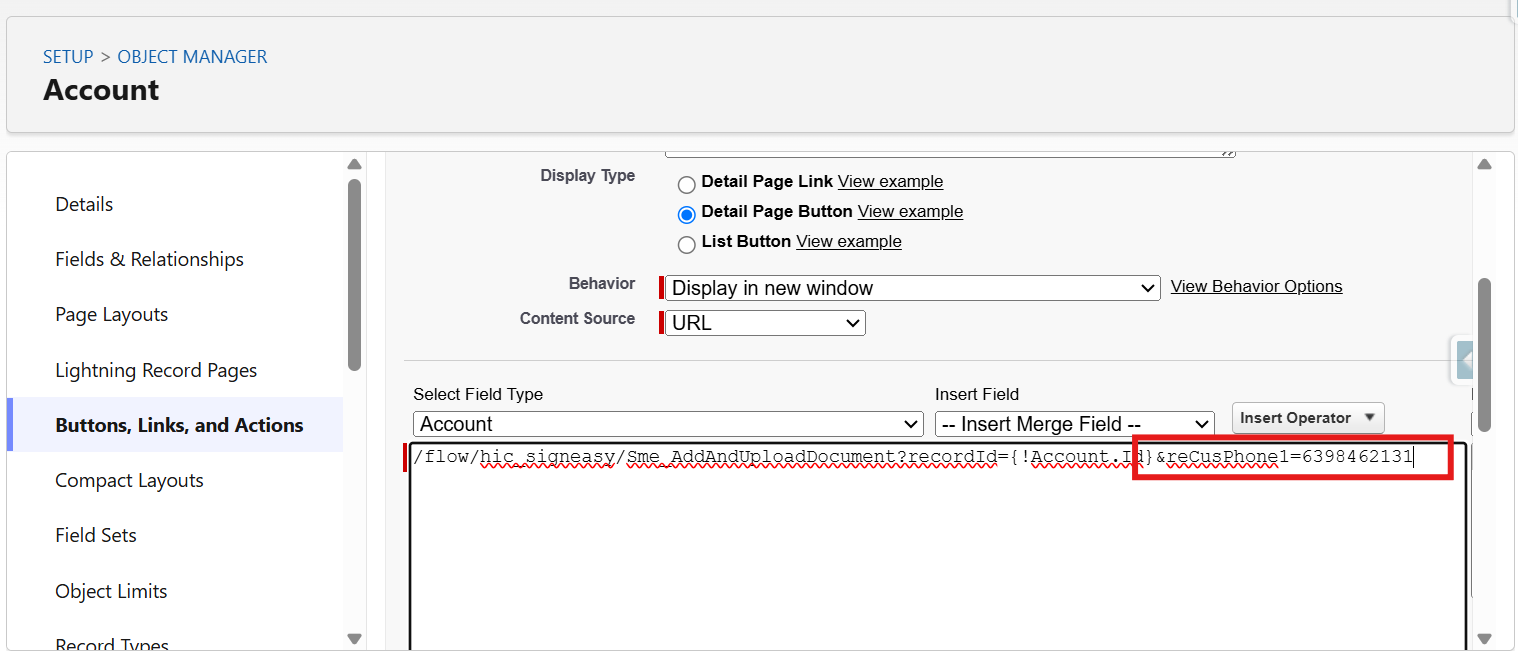
26: reCusWPhone
Parameter Name : &reCusWPhone
Parameter Description : This parameter is used to set WhatsApp Phone Number for the custom recipient.
Example : &reCusWPhone1=9876543210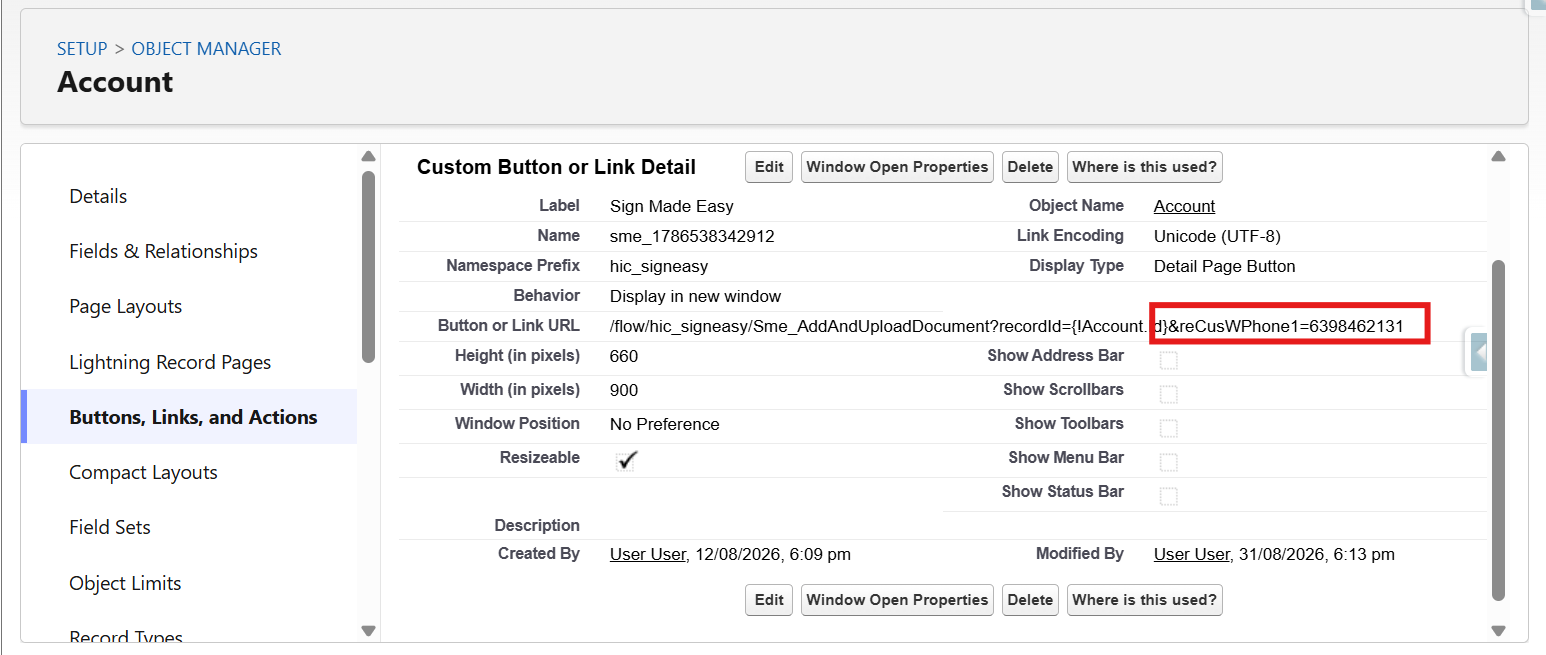
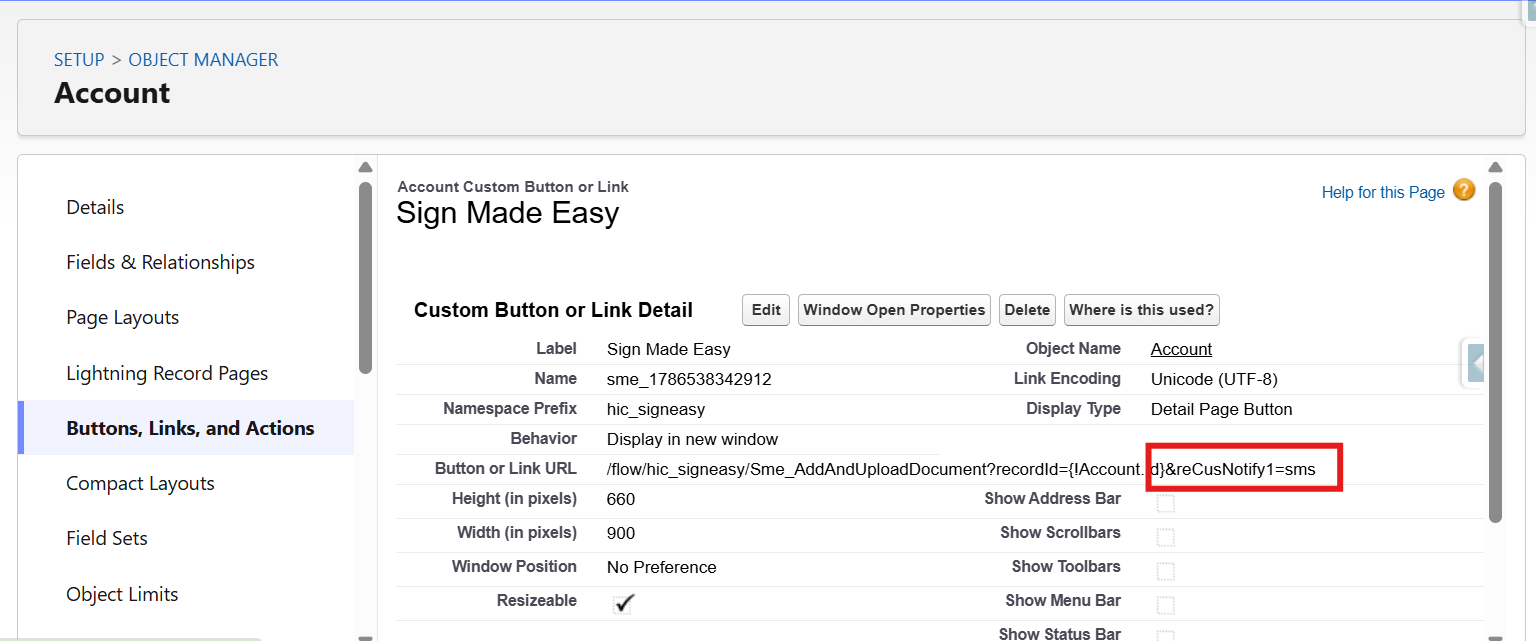
27: reCusNotify
Parameter Name : &reCusNotify1
Parameter Description : This parameter is used to configure the notification method for the custom recipient.
Example : &reCusNotify1=sms
Ref: &reCusNotify1=(email/sms/whatsapp)
Note : A twillio account must be configured for the sms/whatsapp notification.
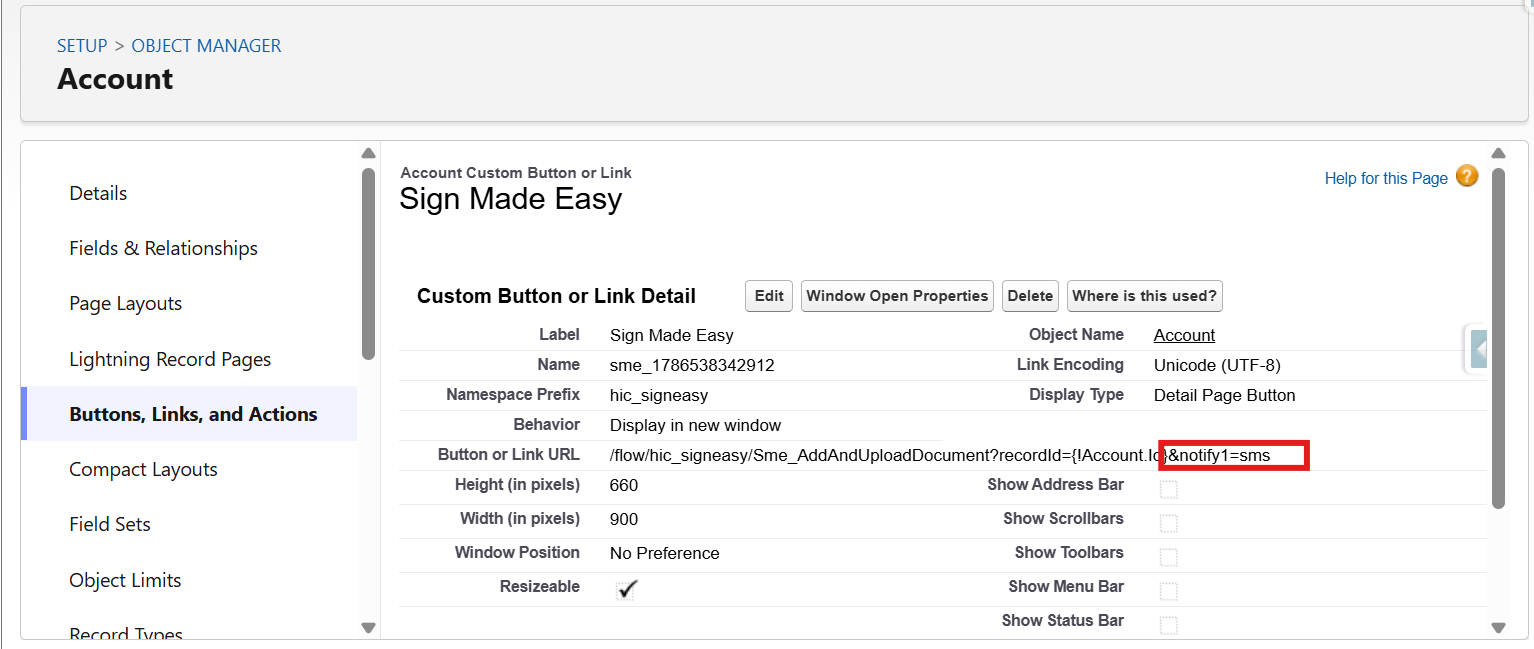
28: notify
Parameter Name : ¬ify
Parameter Description : This parameter is used to configure the notification method for the standard recipient.
Example : ¬ify1=sms
Ref: ¬ify1=(email/sms/whatsapp)
Note : A twillio account must be configured for the sms/whatsapp notification.
29: phonePrefix
Parameter Name : &phonePrefix1
Parameter Description : This parameter is used to specify the country code for the standard recipient’s phone number.
Example : &phonePrefix1=91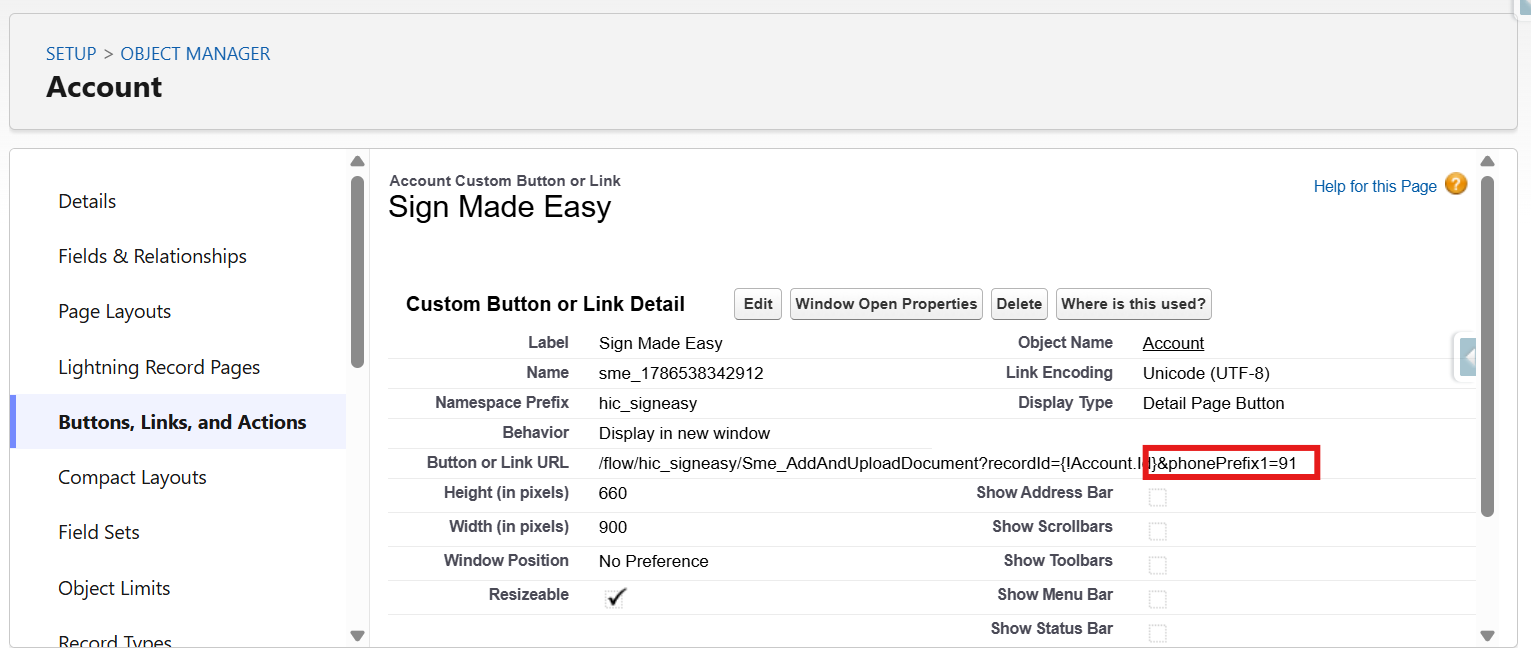
30: whatsappPrefix
Parameter Name : &whatsappPrefix1
Parameter Description : This parameter is used to specify the whatsApp number country code for the standard recipient’s.
Example : &whatsappPrefix1=91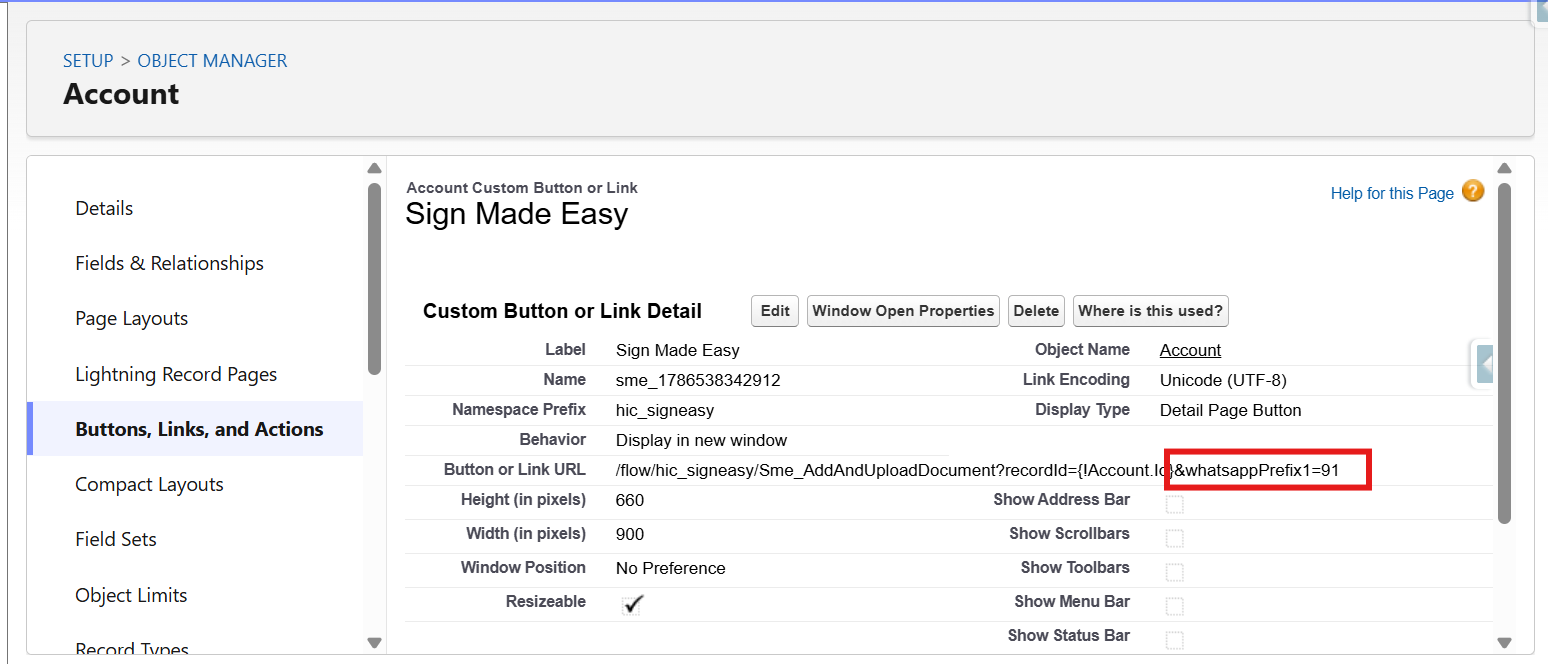
31 : reCusPhonePrefix
Parameter Name : &reCusPhonePrefix1
Parameter Description : This parameter is used to specify the country code for the custom recipient’s phone number.
Example : &reCusPhonePrefix1=91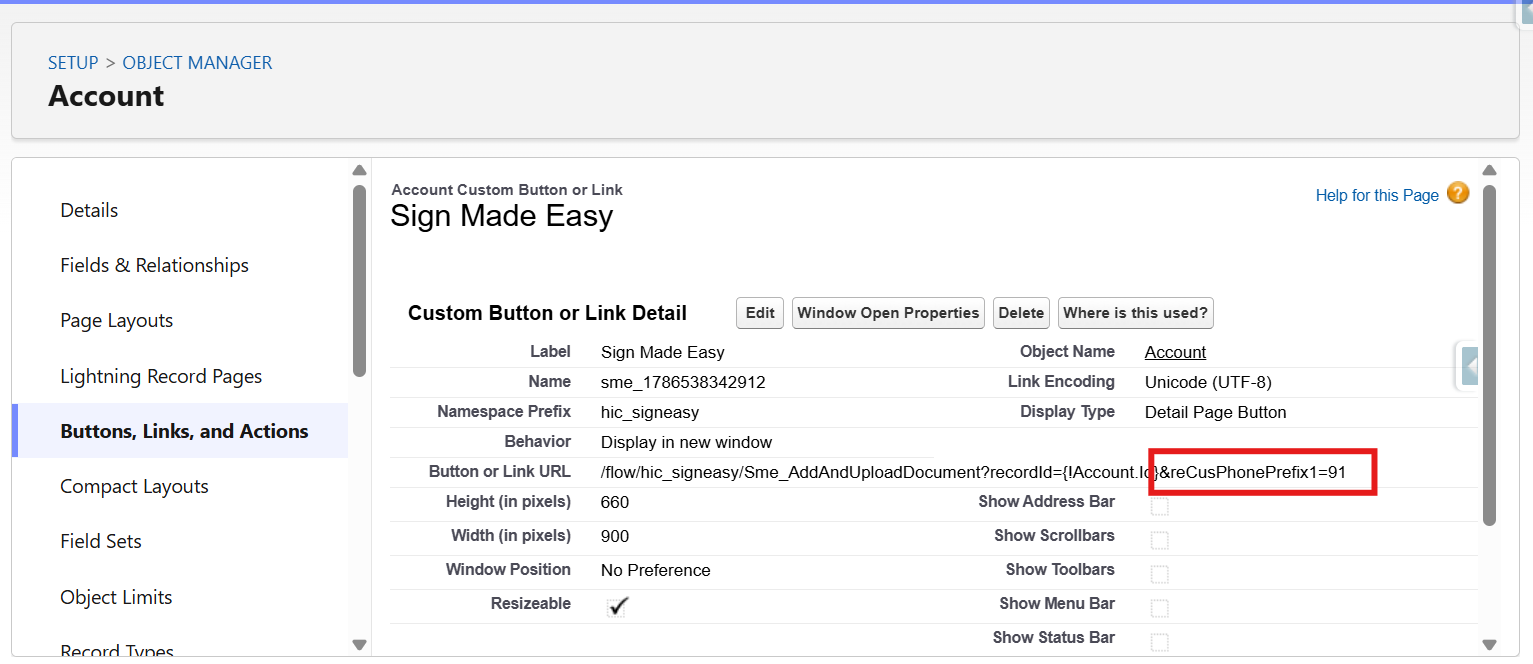
32: reCusWPhonePrefix
Parameter Name : &reCusWPhonePrefix1
Parameter Description : This parameter is used to specify the whatsApp number country code for the custom recipient’s.
Example : &reCusWPhonePrefix1=91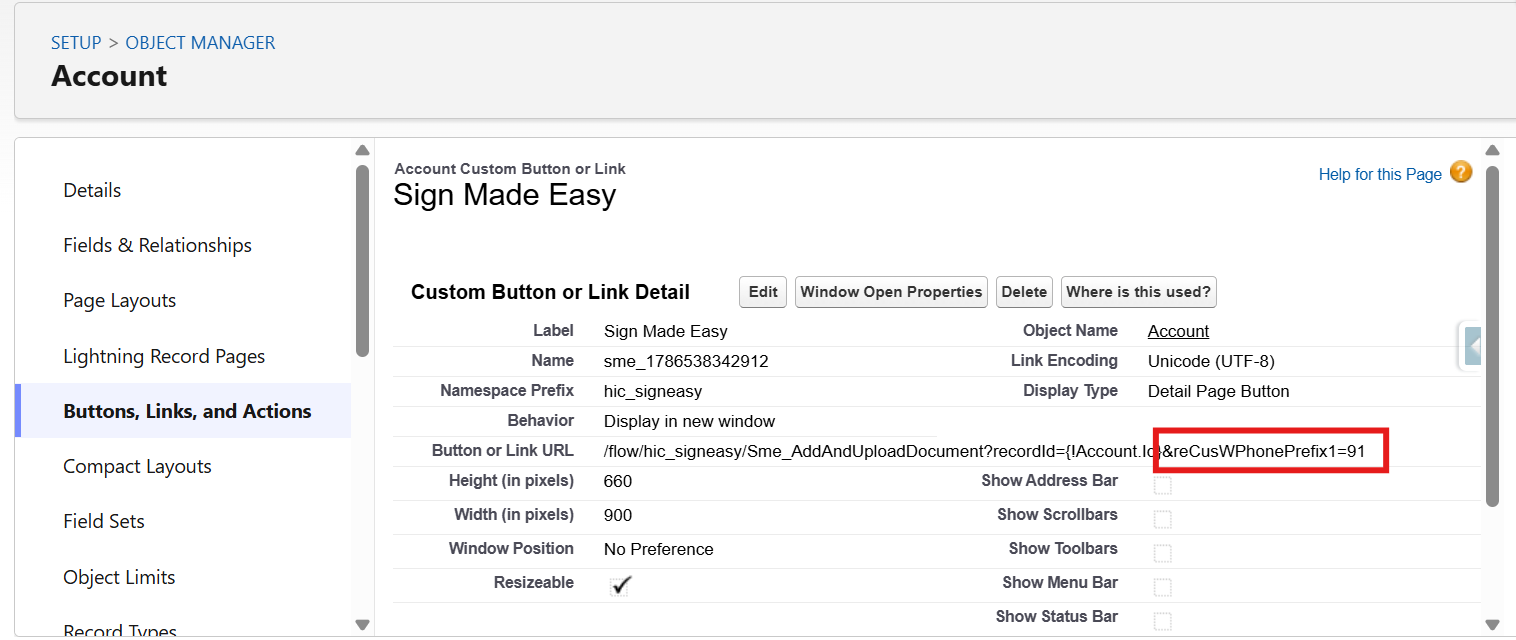
33: assignFF
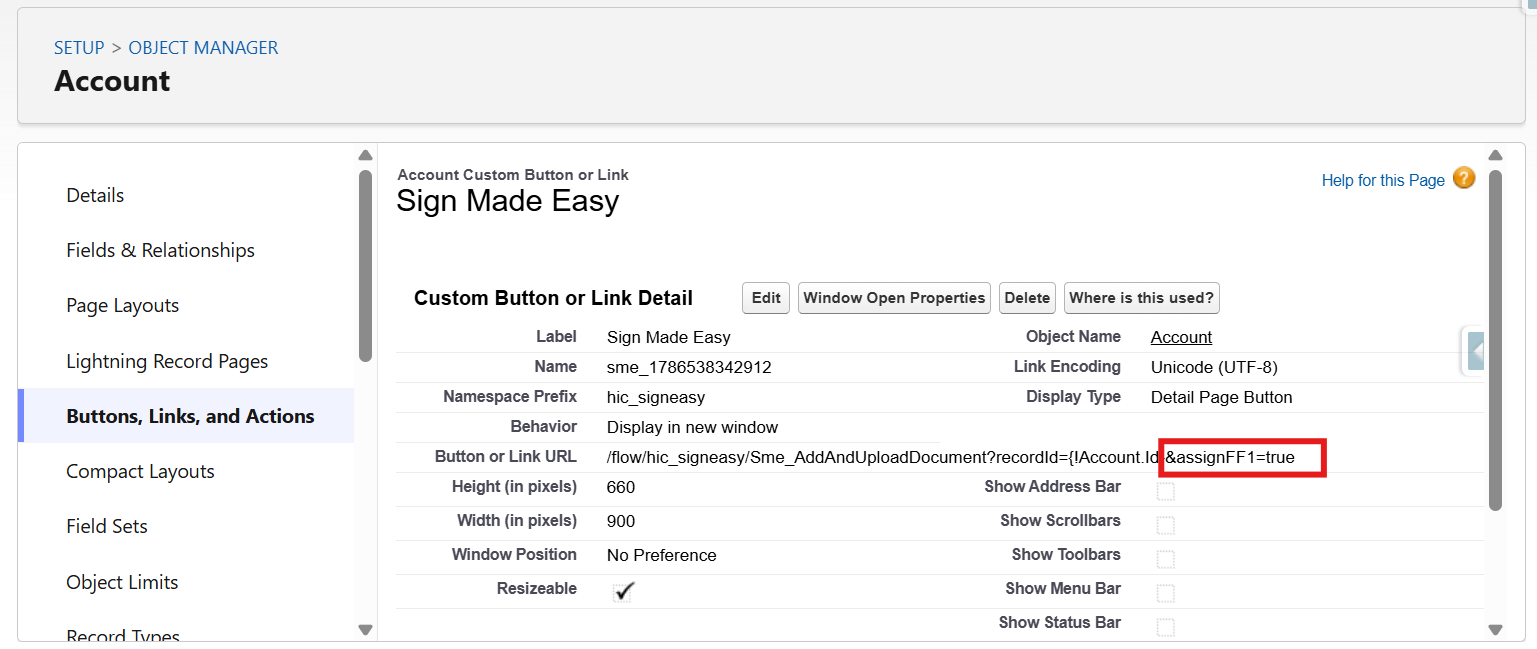
Parameter Name : &assignFF1
Parameter Description : This parameter is used to assign form fields to the standard recipient.
Example : &assignFF1=true
34: reCusFF
Parameter Name : &reCusFF1
Parameter Description : This parameter is used to assign form fields to the custom recipient.
Example : &reCusFF1=true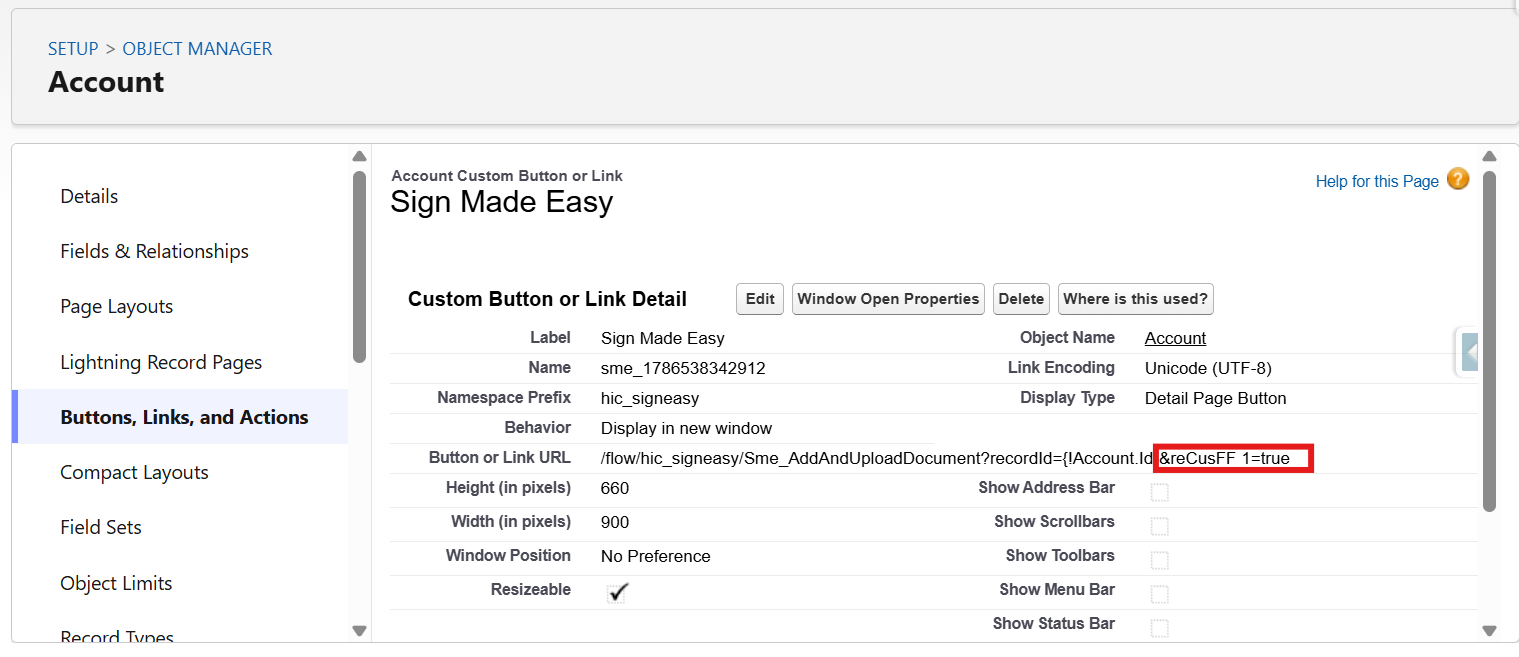
Was this article helpful?
That’s Great!
Thank you for your feedback
Sorry! We couldn't be helpful
Thank you for your feedback
Feedback sent
We appreciate your effort and will try to fix the article